A. BACTERIAL SHAPES, ARRANGEMENTS, AND FORMS
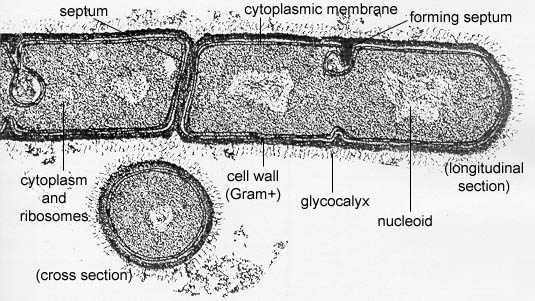
Bacteria are unicellular prokaryotic microorganisms (see Fig. 1) that divide by binary fission, a process by which one bacterium splits into two.
Fig. 1: Transmission electron micrograph of a prokaryotic cell
(Bacillus megaterium)This bacterium is undergoing binary fission. Note the lack of a nuclear membrane or any membrane-bound organelles that are seen in eukaryotic cells.
Microbiology Laboratory Manual by Gary E. Kaiser, PhD, Professor of Microbiology
is licensed under a Creative Commons Attribution 4.0 International License.
There are three common shapes of bacteria:
- coccus
- bacillus
- spiral.
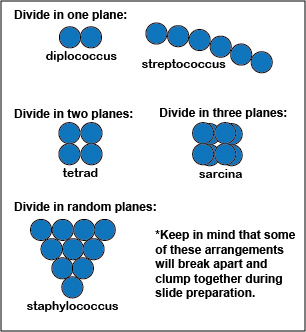
The cocci come in 5 different arrangements; the bacilli in 3 different arrangements; and the spirals in 3 different forms.
1. Coccus
A coccus-shaped bacterium is usually spherical, although some appear oval, elongated, or flattened on one side. Most cocci are approximately 0.5 - 1.0 micrometer (µm) in diameter and may be seen, based on their planes of division and tendency to remain attached after replication, in one of five arrangements: diplococcus, streptococcus, tetrad, sarcina, or staphylococcus. (See Fig. 1A.)
Fig. 1A: Arrangements of coccus-shaped bacteria
Microbiology Laboratory Manual by Gary E. Kaiser, PhD, Professor of Microbiology
is licensed under a Creative Commons Attribution 4.0 International License.
a. Division in one plane produces either a diplococcus or streptococcus. arrangement. (see Fig. 1A)
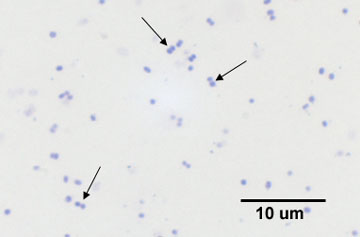
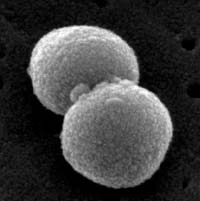
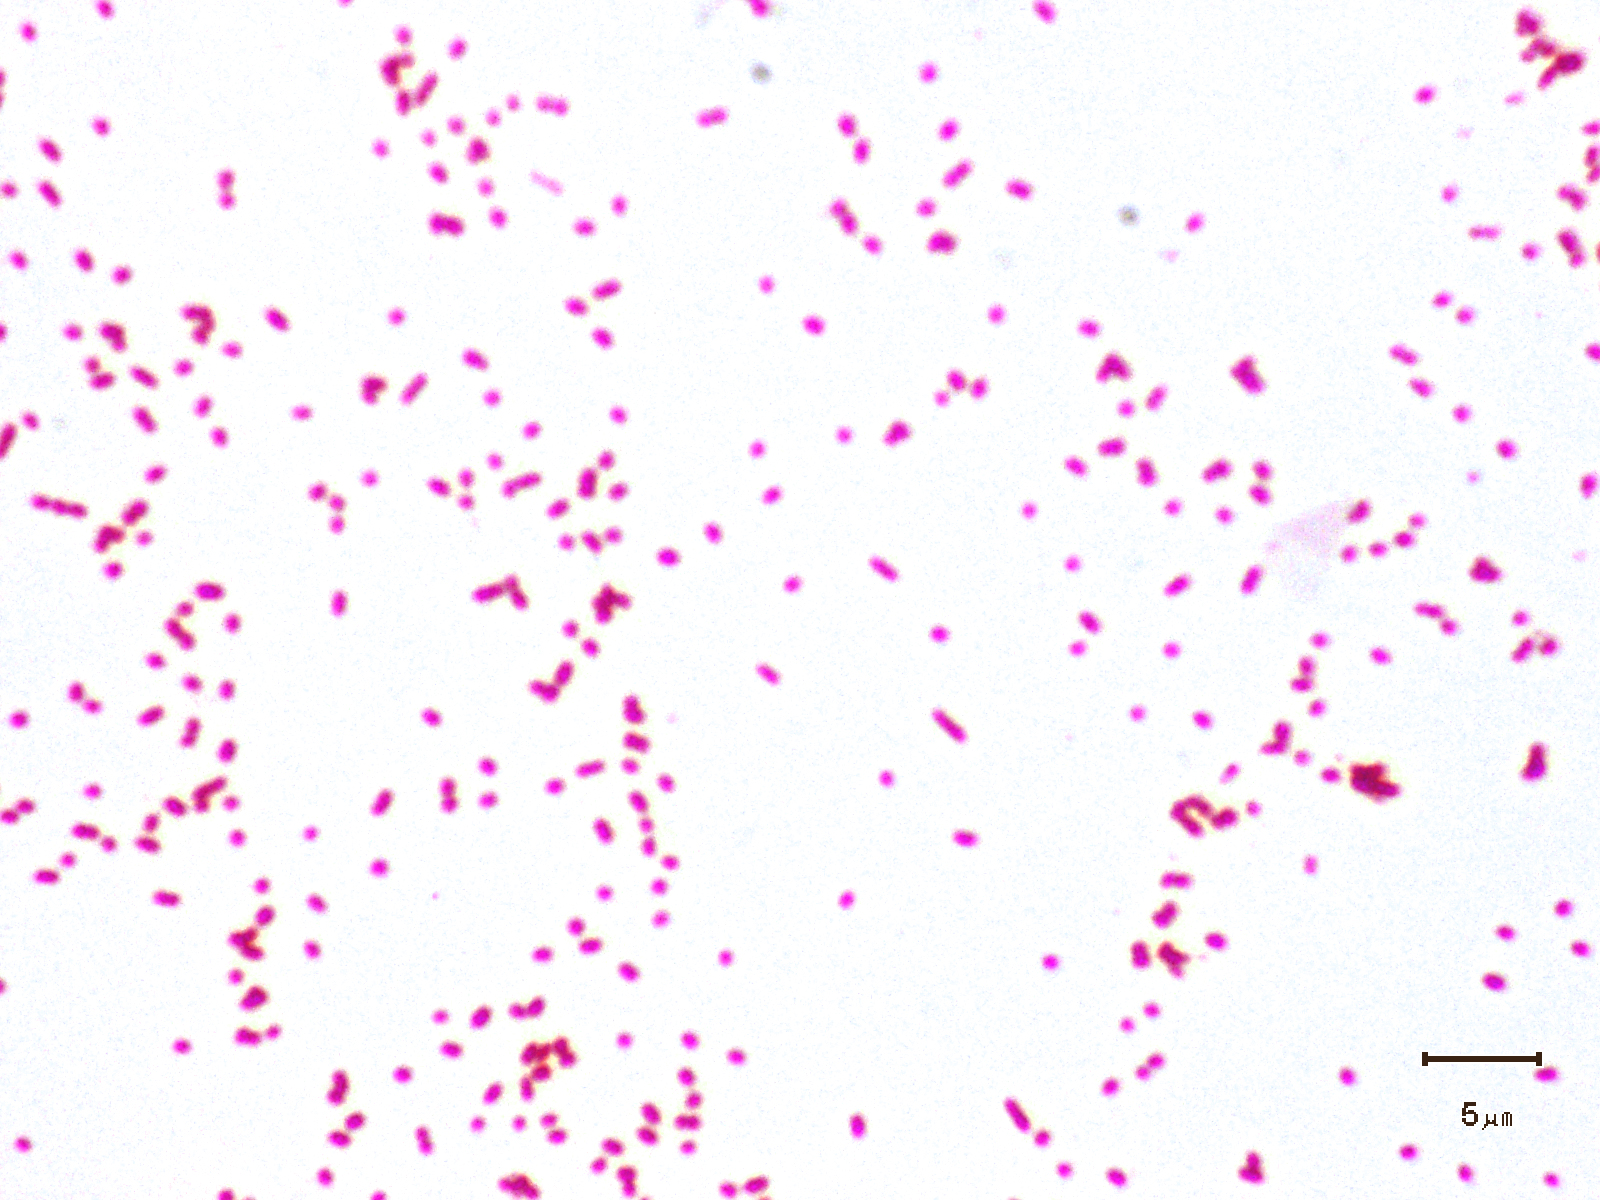
1. Diplococcus: a pair of cocci. (See Figs. 2B, 2C, and 2D.)
Fig. 2B: Photomicrograph of a diplococcus
Fig. 2C: Scanning electron micrograph of a Streptococcus pneumoniae, a diplococcus. Fig. 2D: Scanning electron micrograph of a Neisseria gonorrhoeae, a diplococcus.
Note cocci in pairs (arrows).
Streptococcus pneumoniae is a common cause of ear infections, sinusitis, and pneumonia.
Neisseria gonorrhoeae causes gonorrhea.
Microbiology Laboratory Manual by Gary E. Kaiser, PhD, Professor of Microbiology
is licensed under a Creative Commons Attribution 4.0 International License.By Content Providers(s): CDC/ Janice Haney Carr [Public domain]
Courtesy of the Centers for Disease Control and Prevention.By NIAID (Neisseria gonorrhoeae Bacteria) [CC BY 2.0 (http://creativecommons.org/licenses/by/2.0)], via Wikimedia Commons
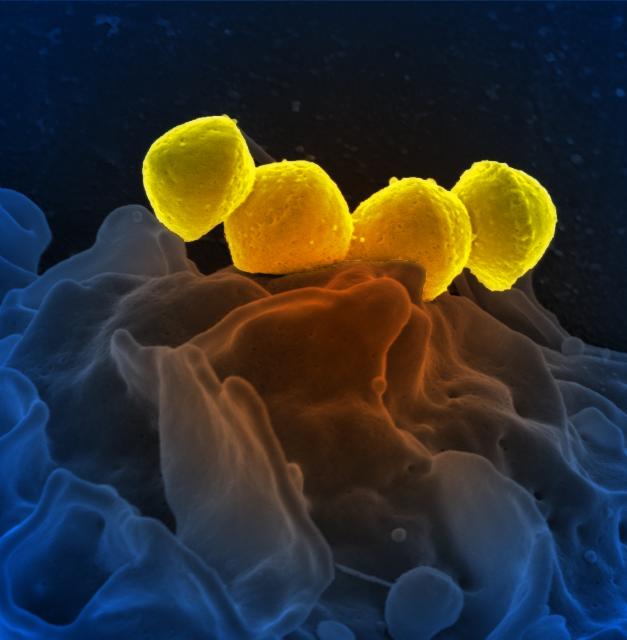
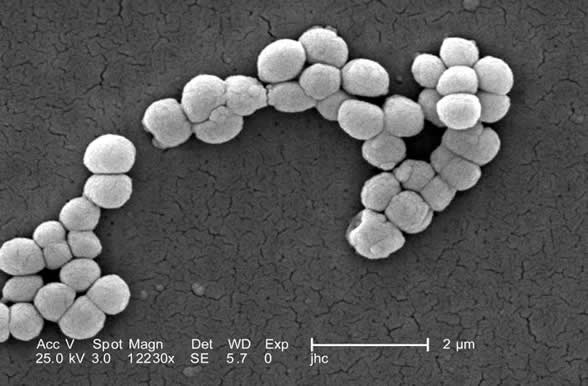
2. Streptococcus: a chain of cocci. (See Figs. 2E, 2F, and 2G.)
Fig. 2E: Photomicrograph of a streptococcus
Fig. 2F: Scanning electron micrograph of Streptococcus pyogenes
Fig. 2G: Scanning electron micrograph of an Enterococcus species
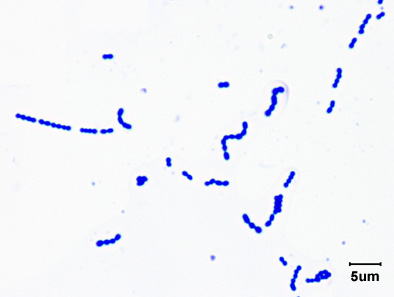
This is Streptococcus pyogenes, the cause of strep throat. Note cocci in chains.
This bacterium causes strep throat.
Enterococcus species are common causes of healthcare-associated infections.
Microbiology Laboratory Manual by Gary E. Kaiser, PhD, Professor of Microbiology
is licensed under a Creative Commons Attribution 4.0 International License.By National Institutes of Health (NIH) (National Institutes of Health (NIH)) [Public domain], via Wikimedia Commons By Content Providers(s): CDC/ Janice Haney Carr [Public domain].
Courtesy of the Centers for Disease Control and Prevention.
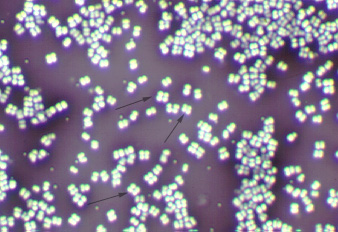
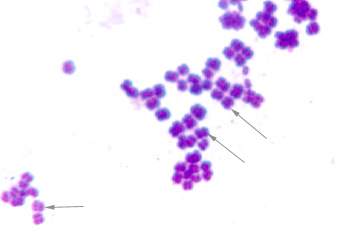
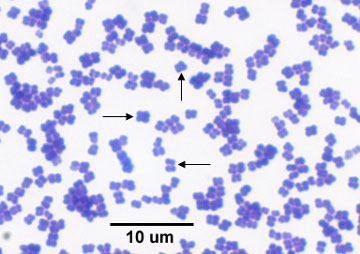
b. Division in two planes produces a tetrad arrangement. (See Figs. 2A)
Tetrad: a square of 4 cocci. (See Figs. 2H and 2I)
Fig. 2H: Tetrad Arrangement: Indirect Stain Fig. 2I: Scanning Electron Micrograph of Micrococcus luteus
A tetrad appears as a square of four cocci (arrows). It is difficult with a conventional light microscope to tell a tetrad arrangement (square of four cocci) from a sarcina arrangement (cube of eight) so in our lab, anytime you see a square of four cocci, say it is either a tetrad or a sarcina arrangement.
Several tetrads are visible.
Microbiology Laboratory Manual by Gary E. Kaiser, PhD, Professor of Microbiology
is licensed under a Creative Commons Attribution 4.0 International License.By Content Providers(s): CDC/Janice Haney Carr [Public domain].
Courtesy of the Centers for Disease Control and Prevention.
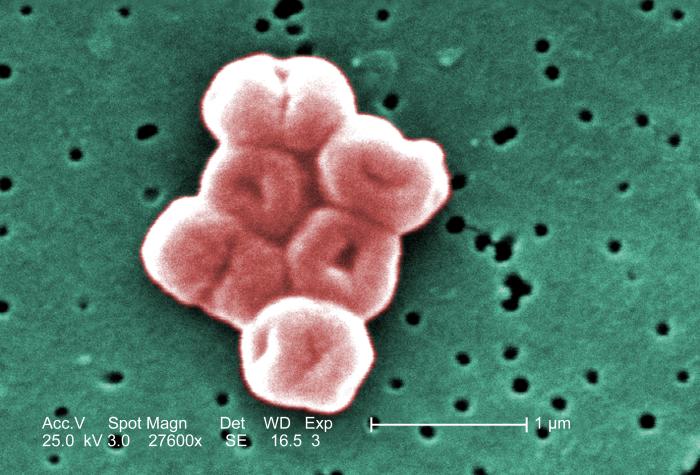
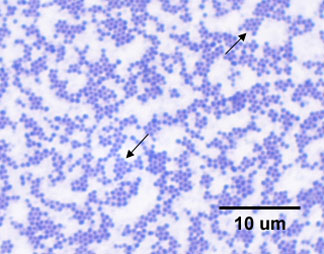
c. Division in three planes produces a sarcina arrangement. (See Fig. 2A.)
Sarcina: A cube of eight cocci. (See Fig. 2L.)
Fig. 2L: Sarcina Arrangement
It is difficult with a conventional light microscope to tell a tetrad arrangement (a square of four cocci) from a sarcina arrangement (cube of eight cocci). In our lab, anytime you see what appears to be a square of four cocci, say it is either a tetrad or a sarcina arrangement.
Microbiology Laboratory Manual by Gary E. Kaiser, PhD, Professor of Microbiology
is licensed under a Creative Commons Attribution 4.0 International License.
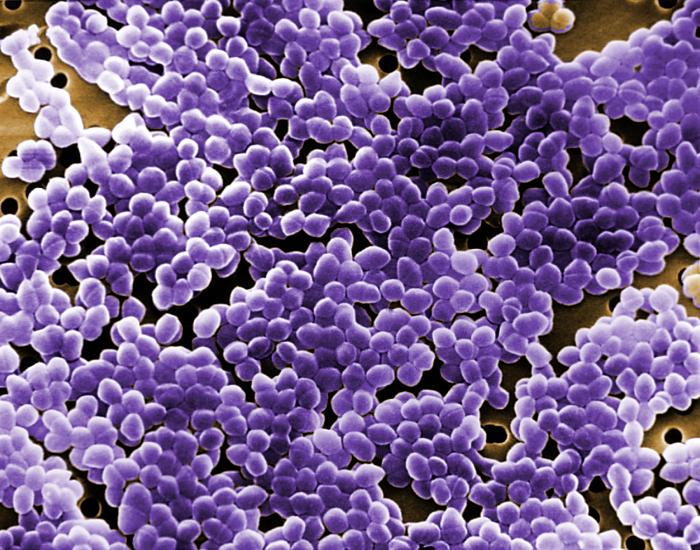
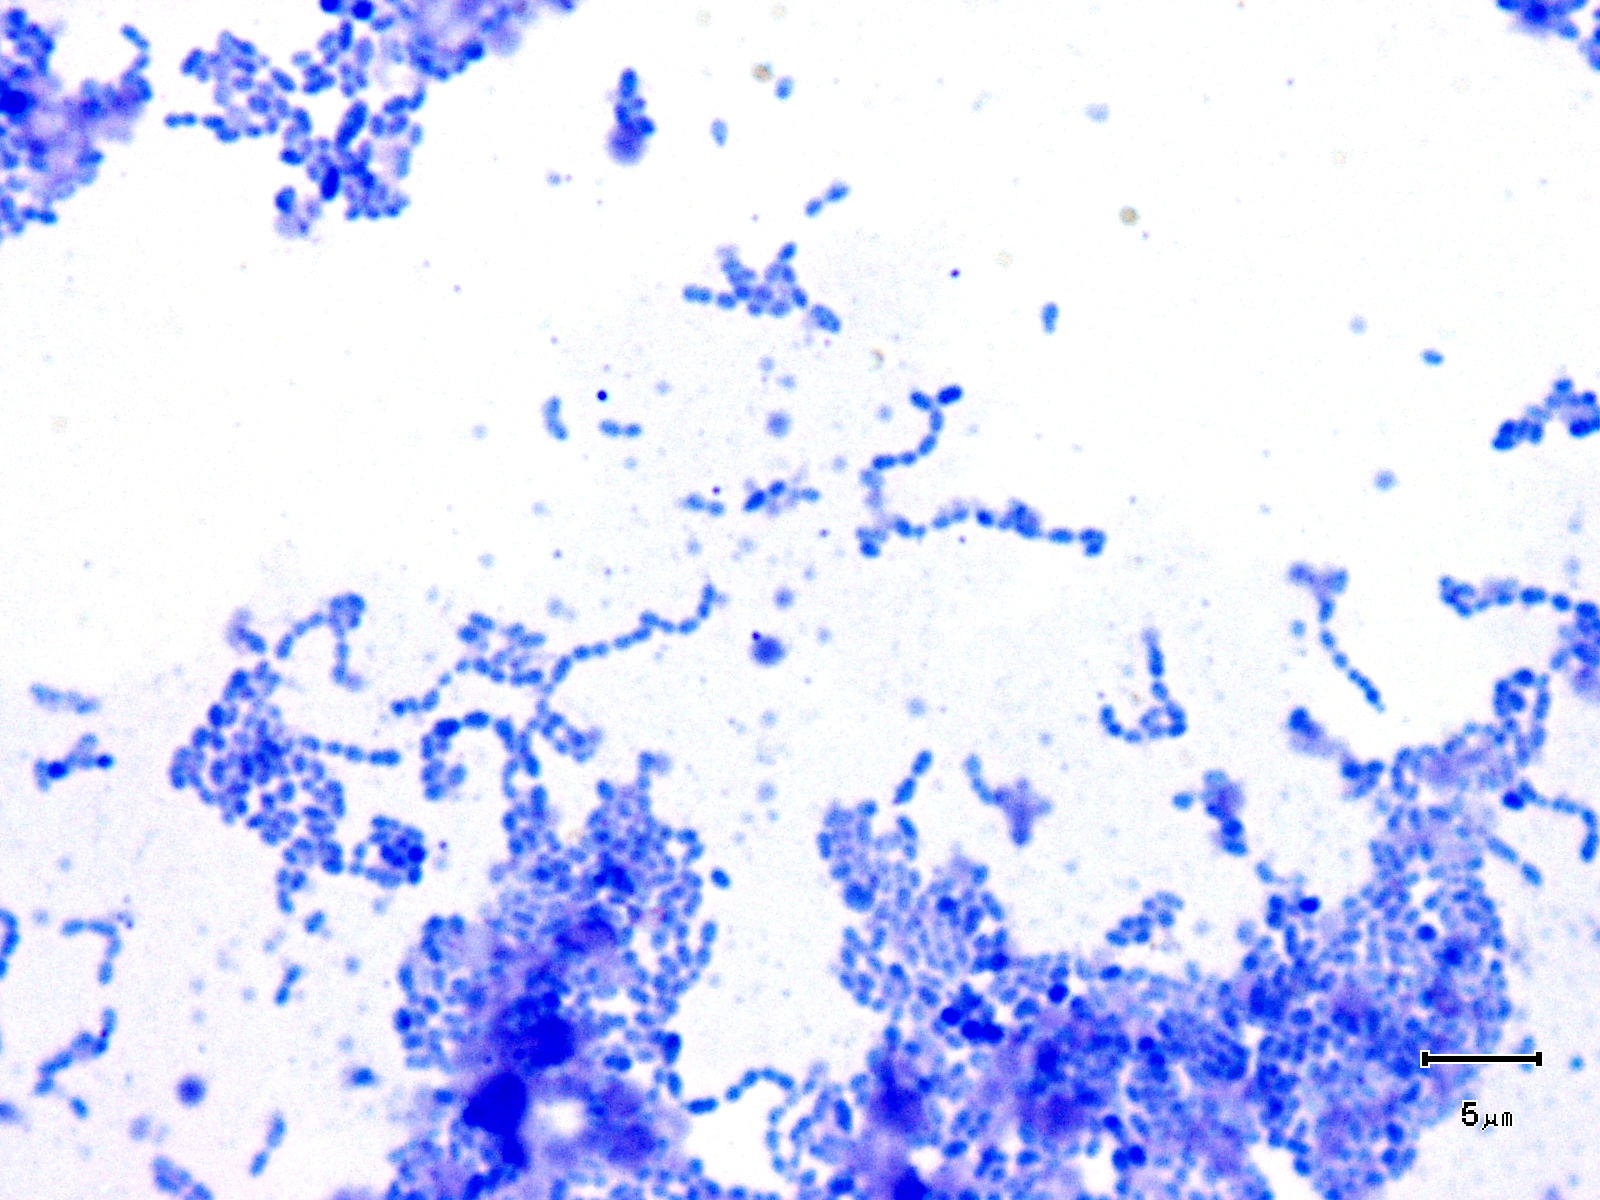
d. Division in random planes produces a staphylococcus arrangement (see Fig. 2A)
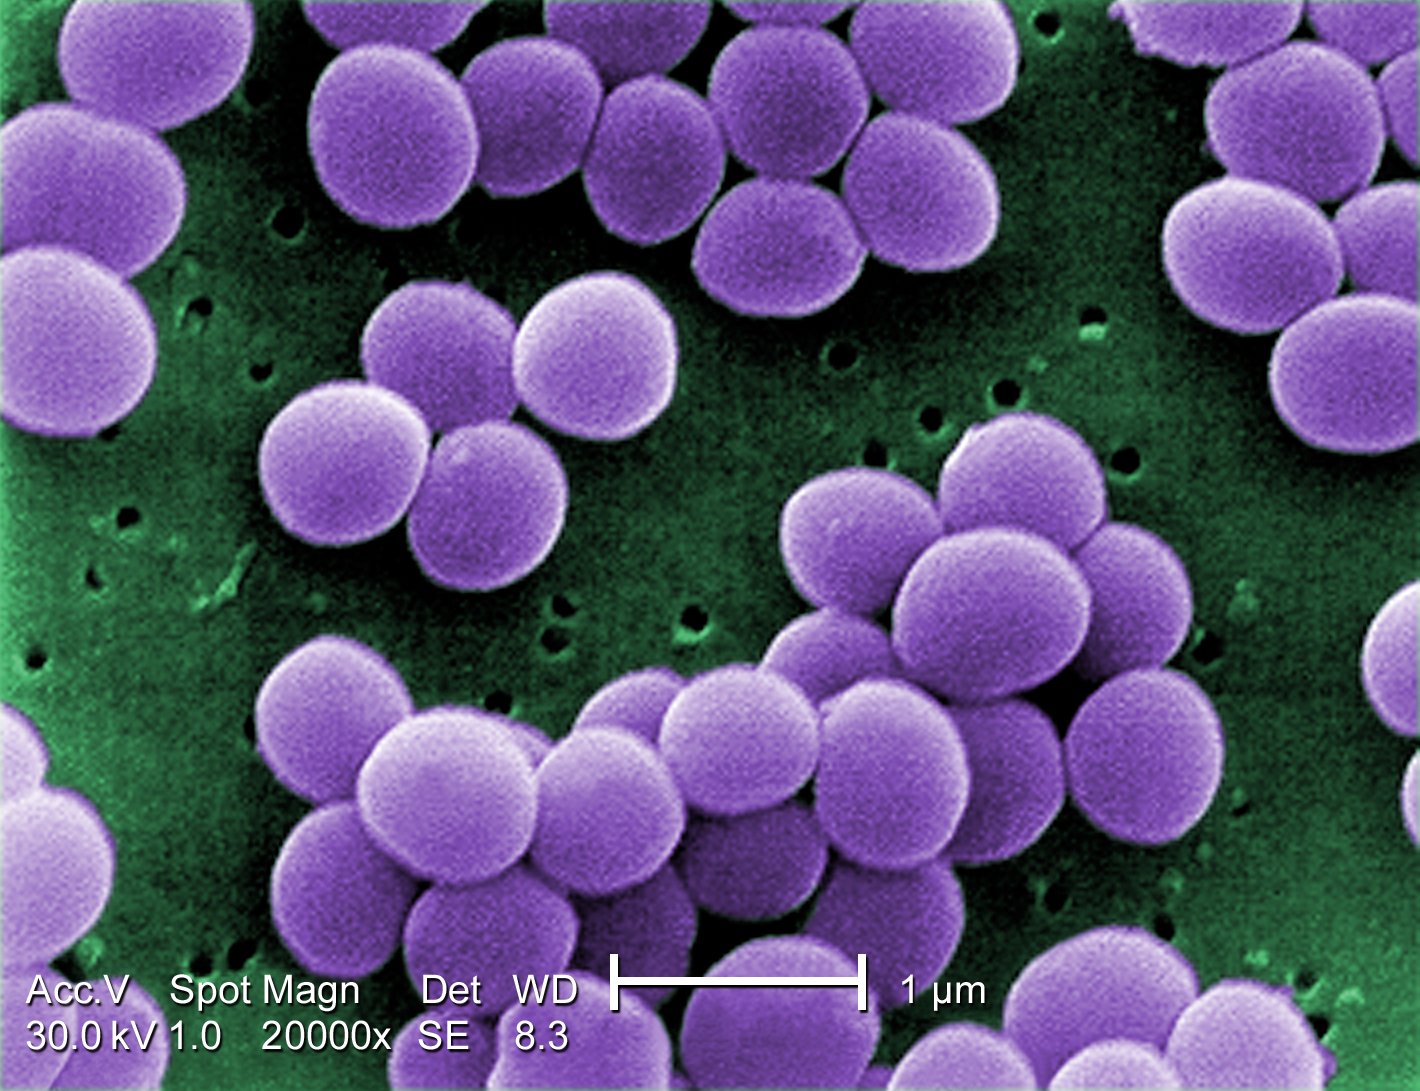
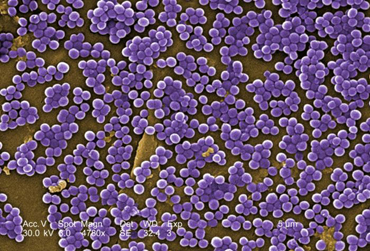
Staphylococcus: cocci in irregular, often grape-like clusters. See Figs. 2M, 2N, and 2O.
Fig. 2M: Staphylococcus aureus
Fig. 2N: Scanning electron micrograph of Staphylococcus aureus , a staphylococcus arrangement Fig. 2O: Scanning electron micrograph of methicillin-resistant Staphylococcus aureus (MRSA)
Note staphylococcus arrangement (cocci in irregular, often grape-like clusters). Staphylococcus aureus is a common cause of skin abscesses, wound infections, and septicemia..
Note staphylococcus arrangement (cocci in irregular, often grape-like clusters). Staphylococcus aureus is a common cause of skin abscesses, wound infections, and septicemia.
Note staphylococcus arrangement (cocci in irregular, often grape-like clusters).By Content Providers(s): CDC/ Matthew J. Arduino, DRPH Photo Credit: Janice Haney Carr [Public domain], via Wikimedia Commons
By Content Providers(s): CDC/ Matthew J. Arduino, DRPH Photo Credit: Janice Haney Carr [Public domain], via Wikimedia Commons
By Content Providers(s): CDC/ Janice Ayers [Public domain].
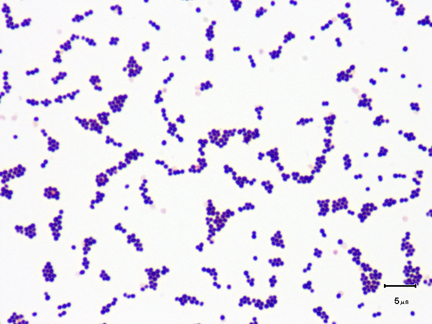
Courtesy of the Centers for Disease Control and Prevention.As you observe these different cocci, keep in mind that the procedures used in slide preparation may cause some arrangements to break apart or clump together (see Figs. 1D and 1E). The correct form, however, should predominate. Also remember that each coccus in an arrangement represents a complete, individual, one-celled organism.
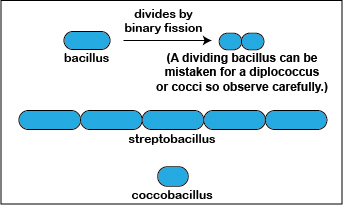
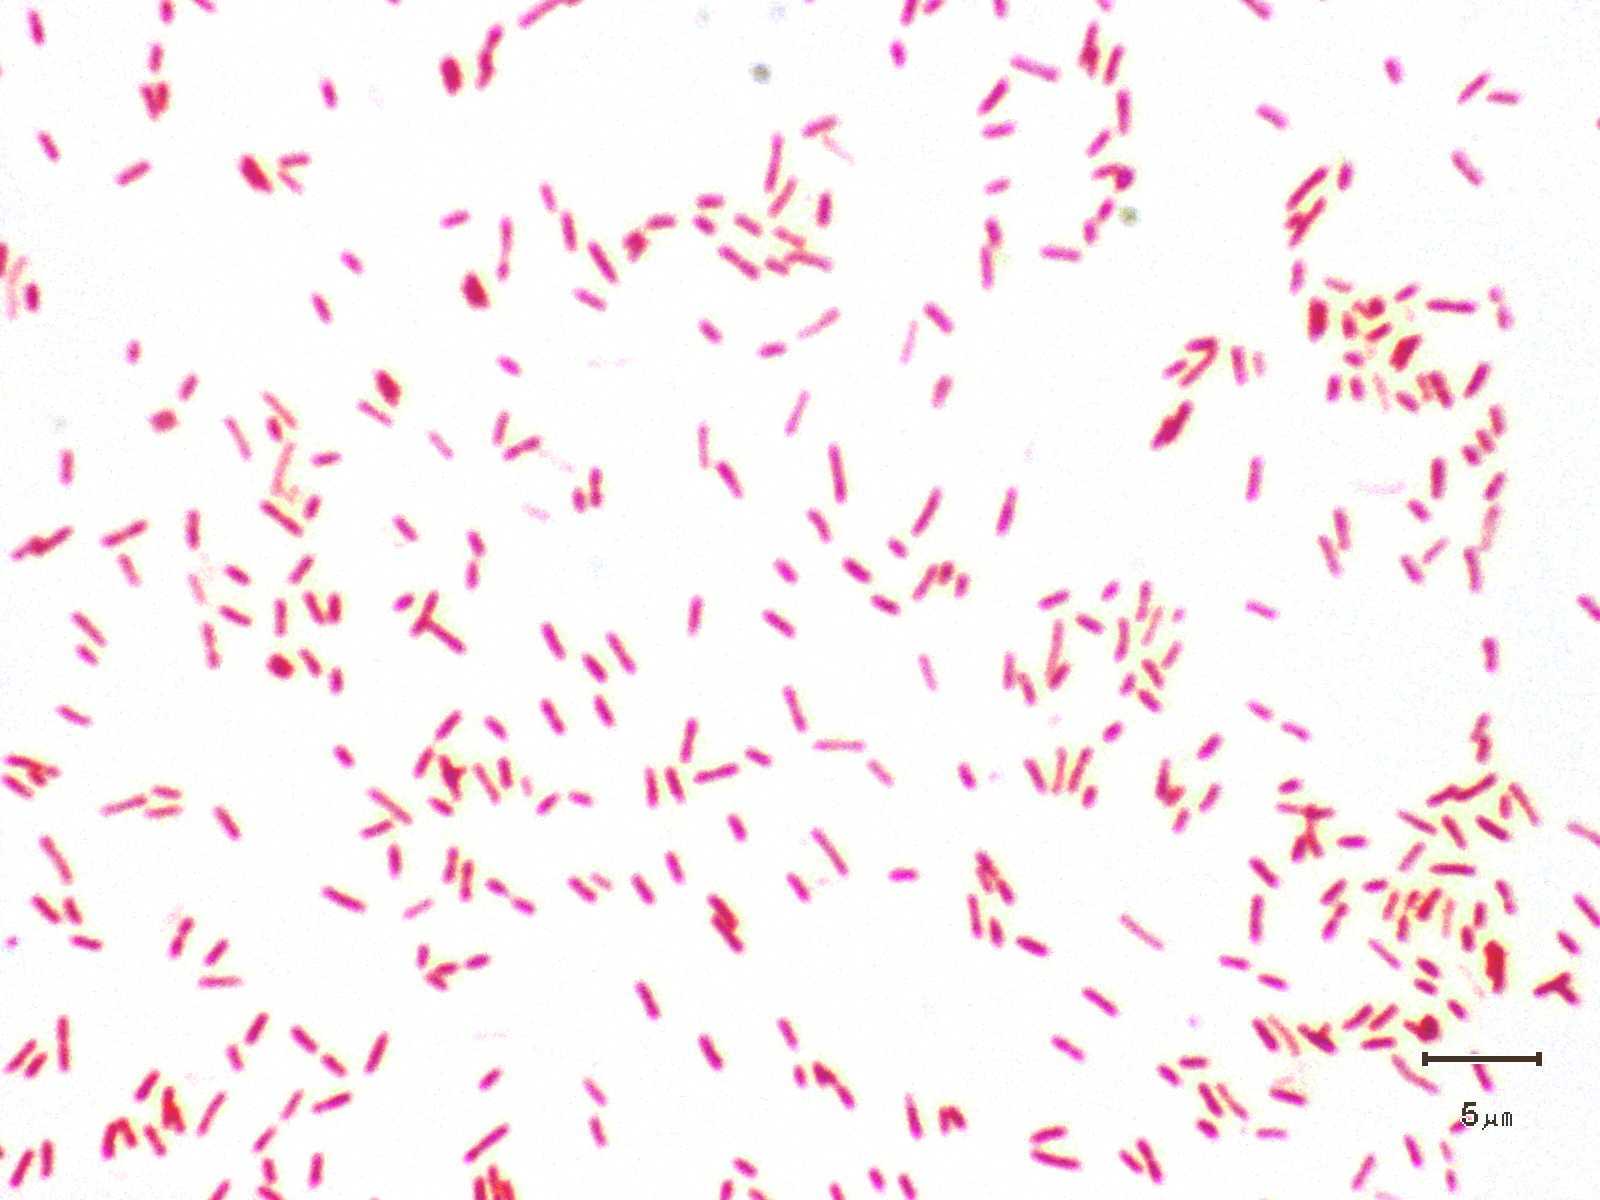
2. Bacillus (rod)
A bacillus or rod is a hot dog-shaped bacterium having one of three arrangements: bacillus, streptobacillus, or coccobacillus. (See Fig 3A.)
Fig. 3A: Arrangements of bacilli
Microbiology Laboratory Manual by Gary E. Kaiser, PhD, Professor of Microbiology
is licensed under a Creative Commons Attribution 4.0 International License.
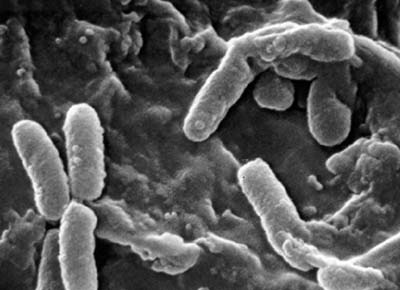
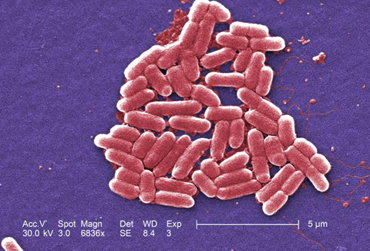
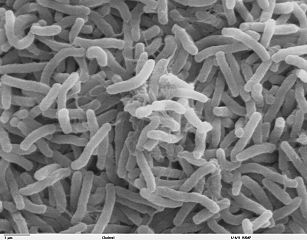
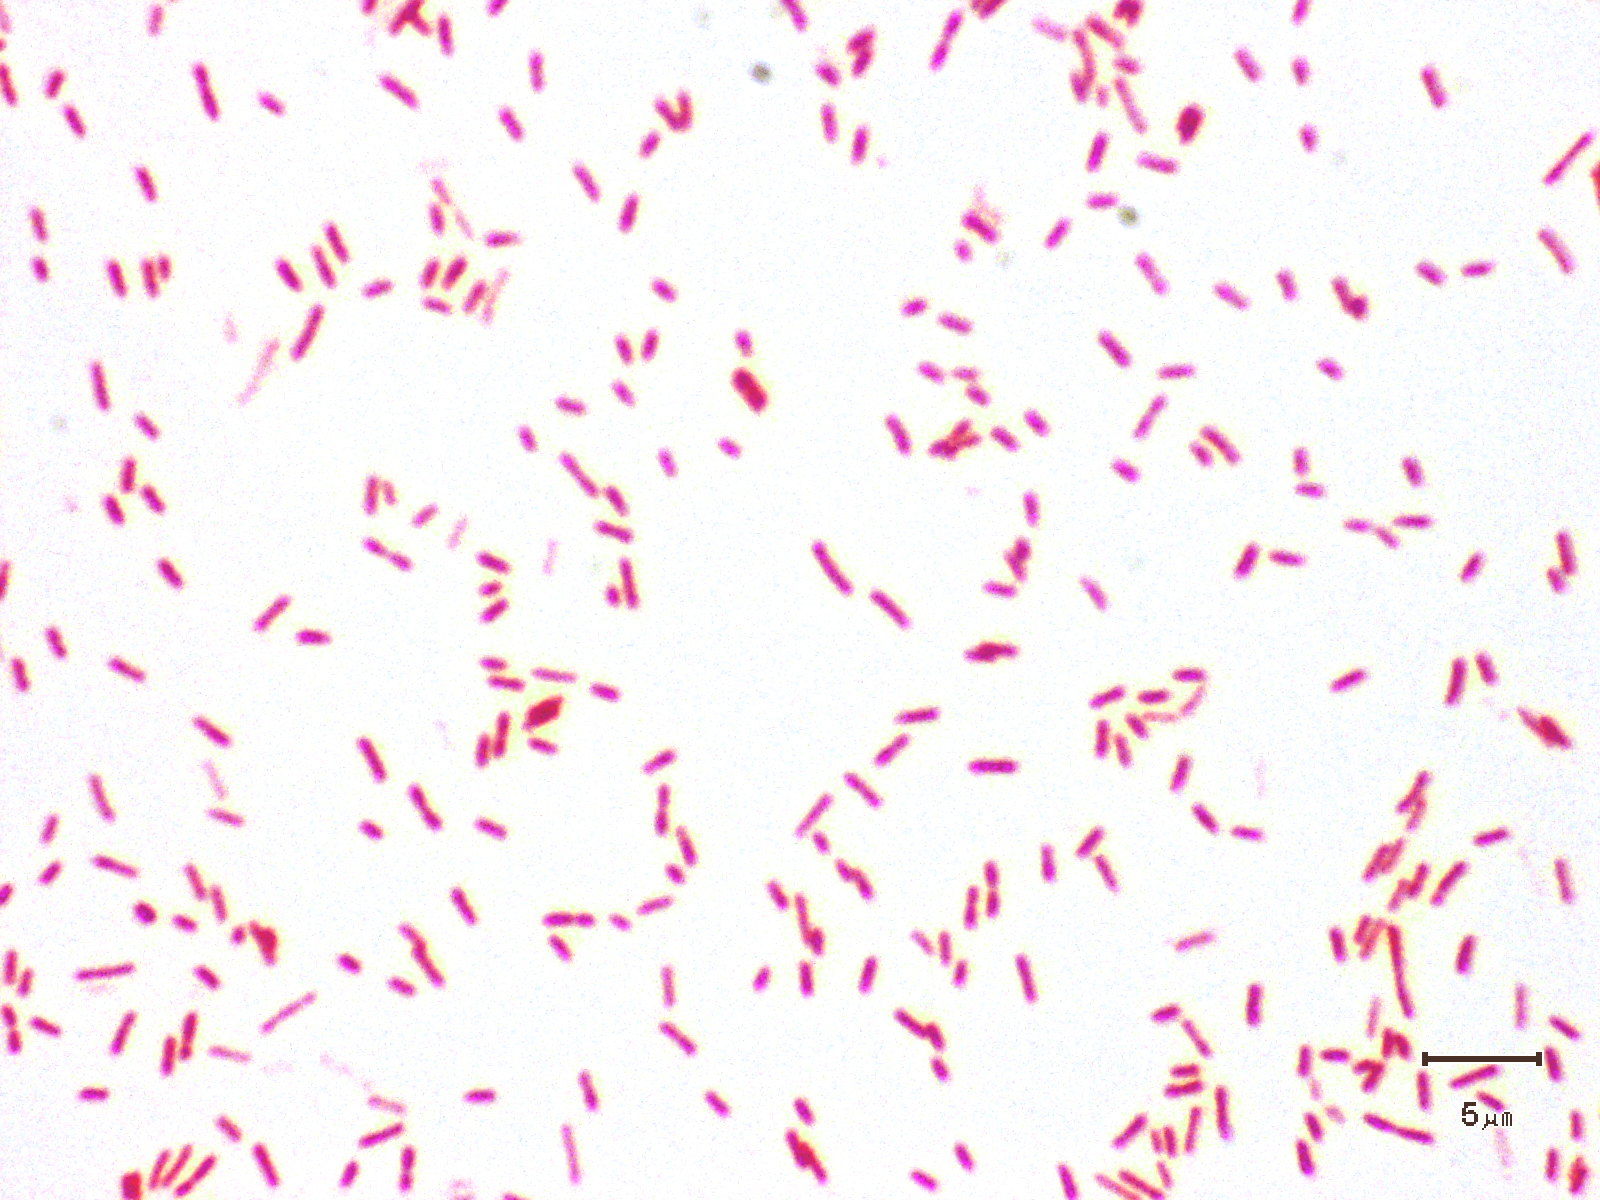
a. Bacillus: a single bacillus. (See Figs. 3B, 3C, and 3D.)
Fig. 3B: Single bacillus (rod).
Fig. 3C: Scanning electron micrograph of Pseudomonas aeruginosa, a bacillus.
Fig. 3D: Scanning electron micrograph of Escherichia coli O157H7, a bacillus.
Escherichia coli is the most common cause of urinary tract infections.
Pseudomonas aeruginosa is a common cause of healthcare-associated infections.
This is a diarrheagenic E. coli, also called shiga toxin-producing E. coli (STEC)
Microbiology Laboratory Manual by Gary E. Kaiser, PhD, Professor of Microbiology
is licensed under a Creative Commons Attribution 4.0 International License.By Content Providers(s): CDC/ Janice Haney Carr [Public domain].
Courtesy of the Centers for Disease Control and Prevention.By Content Providers(s): CDC/ Janice Haney Carr [Public domain]. Courtesy of the Centers for Disease Control and Prevention.
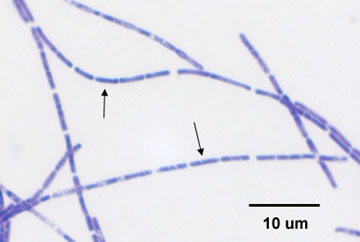
b. Streptobacillus: bacilli in chains. (See Figs. 3A and 3E.)
c. coccobacillus: oval and similar to a coccus. (See Figs. 3F and 3G.)
Fig. 3E: Streptobacillus arrangement
Note bacilli in chains.
Microbiology Laboratory Manual by Gary E. Kaiser, PhD, Professor of Microbiology
is licensed under a Creative Commons Attribution 4.0 International License.
Fig. 3F: The Coccobacillus Acinetobacter
Fig. 3G: Scanning electron micrograph of the coccobacillus Acinetobacter

Note bacilli similar in size to cocci.
Note bacilli similar in size to cocci. By Content Providers: CDC [Public domain].
The Centers for Disease Control and Prevention.By Content Providers(s): CDC/ Janice Haney Carr [Public domain].
Courtesy of the Centers for Disease Control and Prevention.
A single bacillus is typically 0.5-1.0 µm wide and from 1- 4 µm long. Small bacilli or bacilli that are dividing or have just divided by binary fission may at first glance be confused for diplococci or cocci (see Fig. 3A.) so they must be observed carefully. You will, however, be able to see bacilli that have not divided and are definitely rod-shaped as well as bacilli in the process of dividing.
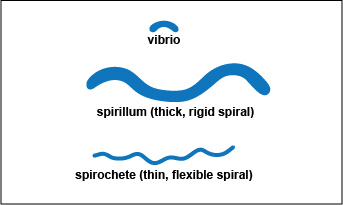
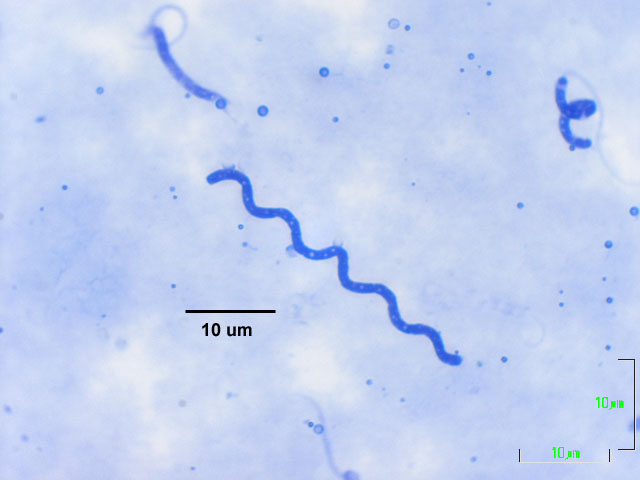
3. Spiral
Spiral-shaped bacteria occur in one of three forms: vibrio, spirillum, or spirochete. (See Fig. 4A):
Fig. 4A: Spiral forms
Microbiology Laboratory Manual by Gary E. Kaiser, PhD, Professor of Microbiology
is licensed under a Creative Commons Attribution 4.0 International License.
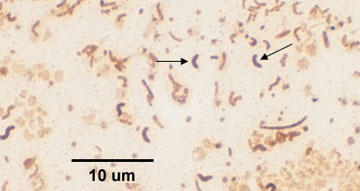
a. Vibrio: an incomplete spiral or comma-shaped (See Figs. 4A, 4B, and 4C.)
Fig. 4B: A vibrio.
Fig. 4C: Scanning Electron micrograph of Vibrio cholerae , a Vibrio.
A vibrio appears as a curved bacillus (arrows).
This vibrio causes cholera.
Microbiology Laboratory Manual by Gary E. Kaiser, PhD, Professor of Microbiology
is licensed under a Creative Commons Attribution 4.0 International License.Information and public domain notice http://remf.dartmouth.edu/imagesindex.html Scanning electron microscope image of Vibrio cholerae bacteria, which infect the digestive system. Zeiss DSM 962 SEM T.J. Kirn, M.J. Lafferty, C.M.P Sandoe and R.K. Taylor.
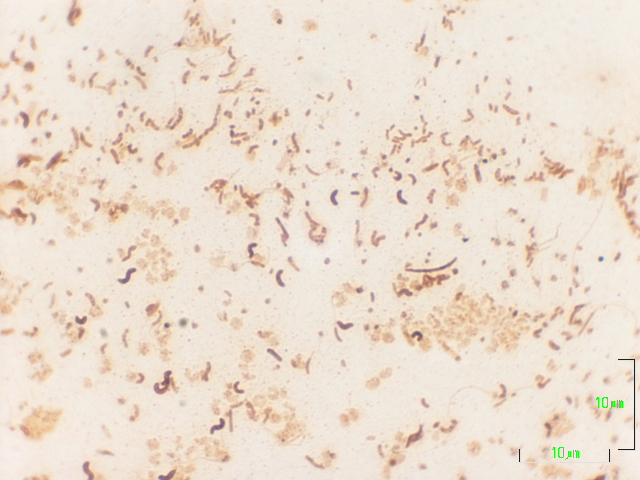
b. Spirillum: a thick, rigid spiral. (See Figs. 4A and 4D)
Fig. 4D: Spirillum
A spirillum is a thick, rigid spiral.
Microbiology Laboratory Manual by Gary E. Kaiser, PhD, Professor of Microbiology
is licensed under a Creative Commons Attribution 4.0 International License.
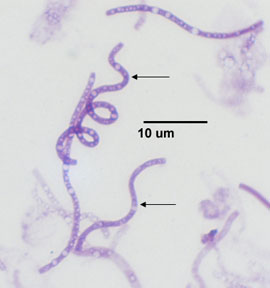
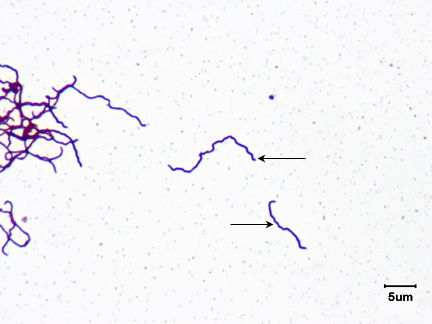
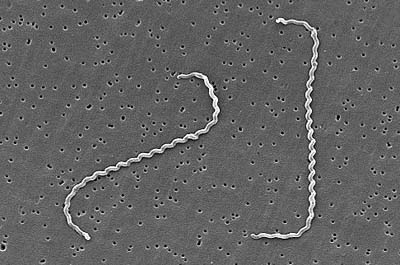
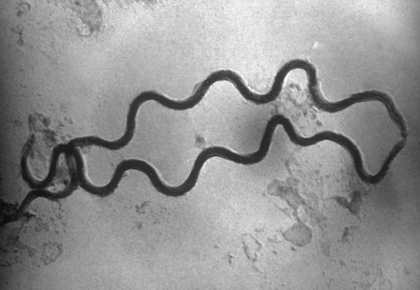
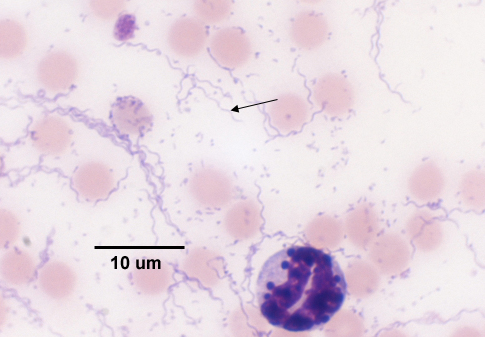
c. Spirochete: a thin, flexible spiral. (See Fig. 4A, 4E, 4F, and 4G.)
Fig. 4E: Treponema pallidum, a spirochete.
Fig. 4F: Scanning electron micrograph of Leptospira interrogans, a spirochete.
Fig. 4G: Scanning electron micrograph of Treponema pallidum, a spirochete.
This spirochete causes syphilis.
This spirochete causes leptospirosis.
This spirochete causes syphilis.
Microbiology Laboratory Manual by Gary E. Kaiser, PhD, Professor of Microbiology
is licensed under a Creative Commons Attribution 4.0 International License.By Content Providers(s): CDC/ Rob Weyant [Public domain].
Courtesy of the Centers for Disease Control and Prevention.By Content Providers(s): CDC/ Janice Haney Carr [Public domain].
Courtesy of the Centers for Disease Control and Prevention.
The spirals you will observe range from 5-40 µm long but some are over 100 µm in length. The spirochetes are the thinnest of the bacteria, often having a width of only 0.25-0.5 µm.
To view a nice interactive illustration comparing size of cells and microbes, see the Cell Size and Scale Resource at the University of Utah. (Genetic Science Learning Center. (2010, September 2) Cell Size and Scale. Retrieved October 19, 2017, from http://learn.genetics.utah.edu/content/cells/scale/ )
YouTube movie illustrating Size Comparison of Microorganisms created by Gracia Alvaro Montoya, MetaBallsStudios (MBS), United Kingdom, Nov., 2017
.jpg)


B. YEASTS
Yeasts, such as the common baker's yeast Saccharomyces cerevisiae (see Fig. 5A), are unicellular fungi. They usually appear spherical and have a diameter of 3 - 5 µm. Yeasts commonly reproduce asexually by a process called budding. (see Figs. 5B and 5C) Unlike bacteria, which are prokaryotic, yeasts are eukaryotic (see Fig. 5D).
Fig. 5A: Direct Stain of Saccharomyces cerevisiae
Fig. 5B: Direct stain of Candida albicans
Fig. 5C: Scanning electron micrograph of Saccharomyces cerevisiae
Fig. 5D: Transmission electron micrograph of Candida albicans, a eukaryotic cell.
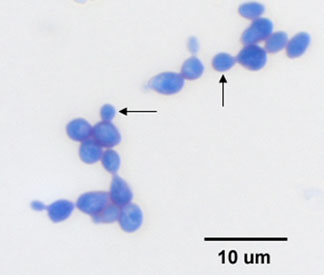
Note budding yeast (arrows) 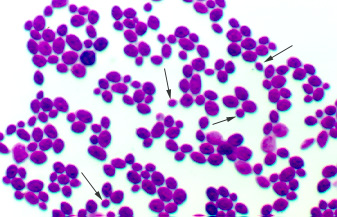
Note budding yeast (arrows). 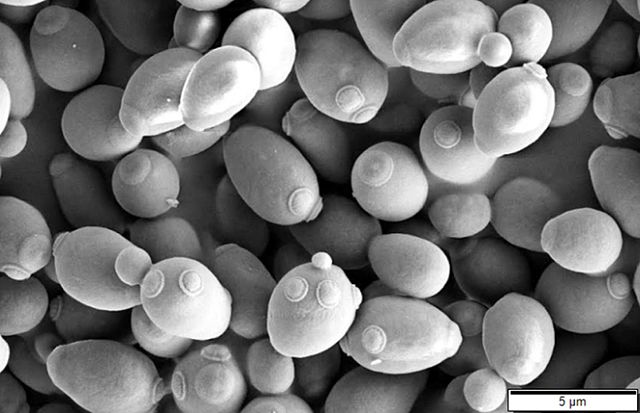
Note budding yeast and bud scars. 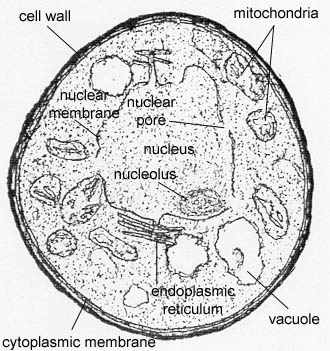
Note the eukaryotic cellular structures.
Microbiology Laboratory Manual by Gary E. Kaiser, PhD, Professor of Microbiology
is licensed under a Creative Commons Attribution 4.0 International License.
Microbiology Laboratory Manual by Gary E. Kaiser, PhD, Professor of Microbiology
is licensed under a Creative Commons Attribution 4.0 International License.By Mogana Das Murtey and Patchamuthu Ramasamy - [1], CC BY-SA 3.0, https://commons.wikimedia.org/w/index.php?curid=52254246
Microbiology Laboratory Manual by Gary E. Kaiser, PhD, Professor of Microbiology
is licensed under a Creative Commons Attribution 4.0 International License.
To view a nice interactive illustration comparing size of cells and microbes, see the Cell Size and Scale Resource at the University of Utah. (Genetic Science Learning Center. (2010, September 2) Cell Size and Scale. Retrieved October 19, 2017, from http://learn.genetics.utah.edu/content/cells/scale/ )
YouTube movie illustrating Size Comparison of Microorganisms created by Gracia Alvaro Montoya, MetaBallsStudios (MBS), United Kingdom, Nov., 2017
C. MEASUREMENT OF MICROORGANISMS
The approximate size of a microorganism can be determined using an ocular micrometer (see Fig. 6) , an eyepiece that contains a scale that will appear superimposed upon the focused specimen.
Fig. 6: An ocular micrometer
The ocular micrometers provided are calibrated so that when using 1000X oil immersion microscopy, the distance between any two lines on the scale represents a length of approximately one micrometer. Remember this does not hold true when using other magnifications.
Microbiology Laboratory Manual by Gary E. Kaiser, PhD, Professor of Microbiology
is licensed under a Creative Commons Attribution 4.0 International License.
Focusing With The 1000X Oil Immersion Objective - Olympus CX31 Microscope. See Fig. 7.
Fig. 7: Olympus CX312 microscope
Microbiology Laboratory Manual by Gary E. Kaiser, PhD, Professor of Microbiology
is licensed under a Creative Commons Attribution 4.0 International License.
Videos reviewing techniques used in this lab:
Preliminary Tips for Using a Microscope
Focusing Using Oil Immersion (1000X) Microscopy
Focusing Using Low Magnifications: Using the 10X Objective
1. Before you plug in the microscope, turn the light intensity control dial on the right-hand side of the microscope to 1 (see Fig. 8). Now plug in the microscope and turn it on (see Fig. 8).
Fig. 8: Olympus CX31 microscope, right side
Microbiology Laboratory Manual by Gary E. Kaiser, PhD, Professor of Microbiology
is licensed under a Creative Commons Attribution 4.0 International License.
2. Place a rounded drop of immersion oil on the area of the slide that is to be observed under the microscope, typically an area that shows some visible stain. Place the slide in the slide holder (see Fig. 9) and center the slide using the two mechanical stage control knobs under the right-hand side of the stage (see Fig. 7 above).
Fig. 9: Olympus CX31 microscope slide holder and stage
Microbiology Laboratory Manual by Gary E. Kaiser, PhD, Professor of Microbiology
is licensed under a Creative Commons Attribution 4.0 International License.
3. Rotate the white-striped 100X oil immersion objective until it is locked into place. This will give a total magnification of 1000X.
4. Turn the light intensity control dial on the right-hand side of the microscope to 6 (see Fig. 8). Make sure the iris diaphragm lever in front under the stage is set approximately at 0.9, (toward the left side of the stage; see Fig. 10). Do not close the field iris diaphragm ring on the light source; that should remain fully open. The knob under the stage on the left-hand side of the stage controlling the height of the condenser should be turned so the condenser is all the way up.
Fig. 10: Olympus CX31 microscope iris diaphragm and stage
Microbiology Laboratory Manual by Gary E. Kaiser, PhD, Professor of Microbiology
is licensed under a Creative Commons Attribution 4.0 International License.
5. Watching the slide and objective lens carefully from the front of the microscope, lower the oil immersion objective into the oil by raising the stage until the white-striped, 100X, oil immersion lens just touches the immersion oil on the slide (see Fig. 11). Do this by turning the coarse focus (larger knob; see Fig. 7 above) away from you until the 100X oil immersion objective lens just touches the oil. When the lens enters the immersion oil you will see the light scatter away from the lens. Do not push the spring-loaded portion of the lens up into the barrel of the oil immersion lens.
Fig. 11: Olympus CX31 Microscope: Oil Immersion
Microbiology Laboratory Manual by Gary E. Kaiser, PhD, Professor of Microbiology
is licensed under a Creative Commons Attribution 4.0 International License.
6. While looking through the eyepieces, turn the fine focus (smaller knob; see Fig. 7 above) away from you at a slow steady speed until the specimen comes into focus. If the specimen does not come into focus within around 30 seconds of turning the fine focus, go back and repeat step 5 and 6.
7. Using the iris diaphragm lever, adjust the light to obtain optimum contrast (see Fig.10 above).
8. When finished, wipe the oil off of the oil immersion objective with lens paper, turn the light intensity control dial back to 1, turn off the microscope, unplug the power cord, and wrap the cord around the cord holder on the back of the microscope.
An alternate focusing technique is to first focus on the slide with the yellow-striped 10X objective by using only the coarse focus control and then without moving the stage, add immersion oil, rotate the white-striped 100X oil immersion objective into place, and adjust the fine focus and the light as needed. This procedure is discussed in the Introduction to the lab manual.
Focusing With The 10X Objective - Olympus CX31 Microscope (see Fig. 7 above)
1. Rotate the yellow-striped 10X objective until it locks into place. This will give a total magnification of 100X.
2. Using the iris diaphragm lever under the stage (see Fig. 10 above), reduce the light by sliding the lever most of the way to the right.
3. Turn the coarse focus control (larger knob; see Fig. 7 above) all the way away from you until it stops.
4. Look through the eyepieces and turn the coarse focus control (larger knob) towards you slowly until the specimen comes into focus.
5. Get the specimen into sharp focus using the fine focus control (smaller knob; see Fig.7 above) and adjust the light for optimum contrast using the iris diaphragm lever (see Fig. 10 above) and/or the light intensity control (see Fig. 7 above).
SPECIMENS
Prepared slides of the following bacteria:
On-line demonstration slides of the following bacteria:
- Staphylococcus aureus
- Escherichia coli
- Treponema pallidum
- Spirillum species
- Micrococcus luteus
- Neisseria gonorrhoeae
- Streptococcus pyogenes
- Bacillus megaterium
Broth culture of Saccharomyces cerevisiae
Human hair
PROCEDURE
TIPS FOR MICROSCOPIC OBSERVATIONS
Move the slide around until you see an area representing the true arrangement of each organism. Also remember:
- In the process of making the slide, some of the arrangements of cocci will clump together and others will break apart. Look carefully to determine the true arrangement.
- Small bacilli (such as Escherichia coli) that are dividing or have just divided by binary fission will look similar to cocci. Look carefully for bacilli that are not dividing and are definitely bacillus-shaped as well as bacilli in the process of dividing to confirm the true shape.
- Bacilli do not divide so as to form clusters. Any such clusters you see are artifacts from preparing the slide.
- Look carefully to see the spirochetes as they are the thinnest of the bacteria. When seen microscopically, spirochetes resemble extremely thin, wavy pencil lines.
1. Using oil immersion microscopy (1000X), observe and measure the bacteria listed below.
a. Staphylococcus aureus: Staphylococcus species, as the genus name implies, are cocci possessing a staphylococcus arrangement (cocci in irregular, often grape-like clusters). Measure the diameter of a single coccus.
b. Escherichia coli: Escherichia coli is a small bacillus. Estimate the length and width of a typical rod.
c. Treponema pallidum: Treponema pallidum is a spirochete - a thin, flexible spiral. On this slide you are examining a direct stain of Treponema pallidum, the bacterium that causes syphilis. Measure the length and width of a typical spirochete.
d. Spirillum: Spirillum species appear as thick, rigid spirals. Measure the length and width of a typical spirillum.
When finished, remove the oil from the prepared slides using either a paper towel or a Kim wipe and return them to their proper tray.
2. Observe the on-line demonstration slides of the following bacteria:
a. Micrococcus luteus: Micrococcus luteus can appear as tetrads or cubes of 8. This strain is a coccus usually exhibiting a tetrad or a sarcina arrangement. Note the shape and arrangement.
b. Neisseria gonorrhoeae: Neisseria species are cocci usually having a diplococcus arrangement. Note the shape and arrangement.
c. Streptococcus pyogenes: Streptococcus species, as the genus name implies, are cocci that usually possess a streptococcus arrangement (cocci in chains). Note the shape and arrangement.
d. Bacillus megaterium: Bacillus megaterium appears as large bacilli in chains (a streptobacillus). Note the shape and arrangement.
3. Prepare a wet mount of baker's yeast (Saccharomyces cerevisiae).
a. Using a pipette, put a small drop of the yeast culture on a microscope slide and place a cover slip over the drop.
b. Using your iris diaphragm lever, reduce the light for improved contrast by moving the lever almost all the way to the right.
c. Observe using oil immersion microscopy. Measure the diameter of a typical yeast cell.
d. When finished, discard the coverslip in the broken glass disposal container, wash the slide with water and dry with a paper towel, and use the same slide again for step 4.
4. Prepare a wet mount of your hair.
a. Remove a small piece of a hair from your head and place it in a small drop of water on a slide.
b. Place a cover slip over the drop and observe using oil immersion microscopy.
c. Measure the diameter of your hair and compare this with the size of each of the bacteria and the yeast observed in steps 1-3.
d. Discard the slide and coverslip in the broken glass disposal container.
5. At the completion of the lab, remove the oil from the oil immersion objective using lens paper and put your microscope away.
RESULTS
1. Make drawings of several of the bacteria from each of the four prepared slides and indicate their approximate size in micrometers.
Diameter = _____ micrometers
Shape =
Arrangement =
Length = _____ micrometers
Width = _____ micrometers
Shape =
Length = _____ micrometers
Width = _____ micrometers
Shape =
Form =Length = _____ micrometers Width = _____ micrometers
Shape =
Form =
2. Make drawings of several of the bacteria from each of the four demonstration slides and indicate their approximate size in micrometers.
Shape =
Arrangement =
Shape =
Arrangement =
Shape = Arrangement =
Shape = Arrangement =
3. Make a drawing of several yeast cells and indicate their size in micrometers.
Diameter = _____ micrometers
4. Make a drawing indicating the size of the bacteria and yeast observed above relative to the diameter of your hair.
Diameter = _____ micrometers
PERFORMANCE OBJECTIVES FOR LAB 1
After completing this lab, the student will be able to perform the following objectives:
DISCUSSION
1. State three basic shapes of bacteria.
2. State and describe five different arrangements of cocci.
3. State and describe three different arrangements of bacilli.
4. State and describe three different spiral forms.
5. Describe the appearance of a typical yeast.
RESULTS
1. When given an oil immersion microscope, a prepared slide of a microorganism, and an ocular micrometer, determine the size of that organism in micrometers.2. Using a microscope, identify different bacterial shapes, arrangements, and forms.
3. Differentiate a yeast from a coccus-shaped bacterium by its size.
4. Compare the size of the microorganisms observed in lab with the diameter of a hair when using oil immersion microscopy.


Microbiology Laboratory Manual by Gary E. Kaiser, PhD, Professor of Microbiology
is licensed under a Creative Commons Attribution 4.0 International License.
Last updated: February, 2023
Please send comments and inquiries to Dr.
Gary Kaiser