DISCUSSION
The Gram stain is the most widely used staining procedure in bacteriology. It is called a differential stain since it differentiates between Gram-positive and Gram-negative bacteria. Bacteria that stain purple with the Gram staining procedure are termed Gram-positive; those that stain pink are said to be Gram-negative. The terms positive and negative have nothing to do with electrical charge, but simply designate two distinct morphological groups of bacteria.
Gram-positive and Gram-negative bacteria stain differently because of fundamental differences in the structure of their cell walls. The bacterial cell wall serves to give the organism its size and shape as well as to prevent osmotic lysis. The material in the bacterial cell wall which confers rigidity is peptidoglycan.
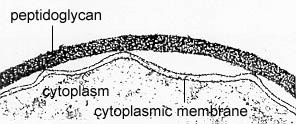
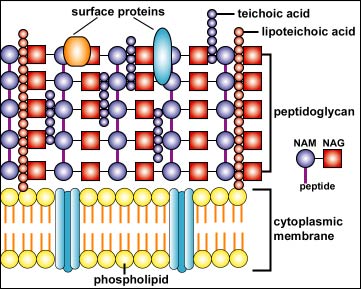
In electron micrographs, the Gram-positive cell wall appears as a broad, dense wall 20-80 nm thick and consisting of numerous interconnecting layers of peptidoglycan (see Figs. 1A and 1B). Chemically, 60 to 90% of the Gram-positive cell wall is peptidoglycan. Interwoven in the cell wall of Gram-positive are teichoic acids. Teichoic acids, which extend through and beyond the rest of the cell wall, are composed of polymers of glycerol, phosphates, and the sugar alcohol ribitol. Some have a lipid attached (lipoteichoic acid). The outer surface of the peptidoglycan is studded with proteins that differ with the strain and species of the bacterium.
Fig. 1A: Electron Micrograph of a Gram-Positive Cell Wall
Fig. 1B: Structure of a Gram-Positive Cell Wall
The Gram-positive cell wall appears as dense layer typically composed of numerous rows of peptidoglycan, and molecules of lipoteichoic acid, wall teichoic acid and surface proteins.Gary E. Kaiser, Ph.D.
Professor of Microbiology
The Community College of Baltimore County, Catonsville Campus
This work is licensed under a Creative Commons Attribution 3.0 Unported License
Gary E. Kaiser, Ph.D.
Professor of Microbiology
The Community College of Baltimore County, Catonsville Campus
This work is licensed under a Creative Commons Attribution 3.0 Unported License
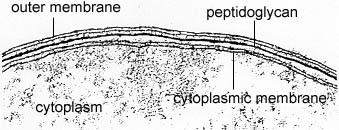
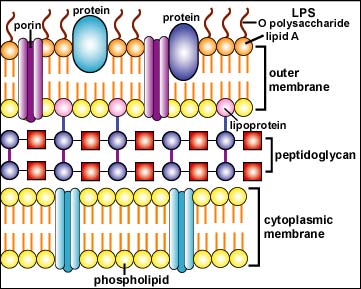
The Gram-negative cell wall, on the other hand, contains only 2-3 layers of peptidoglycan and is surrounded by an outer membrane composed of phospholipids, lipopolysaccharide, lipoprotein, and proteins (see Figs. 2A and 2B). Only 10% - 20% of the Gram-negative cell wall is peptidoglycan. The phospholipids are located mainly in the inner layer of the outer membrane, as are the lipoproteins that connect the outer membrane to the peptidoglycan. The lipopolysaccharides, located in the outer layer of the outer membrane, consist of a lipid portion called lipid A embedded in the membrane and a polysaccharide portion extending outward from the bacterial surface. The outer membrane also contains a number of proteins that differ with the strain and species of the bacterium.
For further information on the Gram-negative and Gram-positive cell wall, see the following in your CourseArc Lectures:
Fig. 2A: Electron Micrograph of a Gram-Negative Cell Wall
Fig.2B: Structure of a Gram-Negative Cell Wall
The Gram-negative cell wall is composed of a thin, inner layer of peptidoglycan and an outer membrane consisting of molecules of phospholipids, lipopolysaccharides (LPS), lipoproteins and sutface proteins. The lipopolysaccharide consists of lipid A and O polysaccharide.Gary E. Kaiser, Ph.D.
Professor of Microbiology
The Community College of Baltimore County, Catonsville Campus
This work is licensed under a Creative Commons Attribution 3.0 Unported License
Gary E. Kaiser, Ph.D.
Professor of Microbiology
The Community College of Baltimore County, Catonsville Campus
This work is licensed under a Creative Commons Attribution 3.0 Unported License
For further information on the bacterial cell wall, see the following in your CourseArc Lectures:
The Gram staining procedure involves four basic steps:
1. The bacteria are first stained with the basic dye crystal violet. Both Gram-positive and Gram-negative bacteria become directly stained and appear purple after this step.
2. The bacteria are then treated with Gram's iodine solution. This allows the stain to be retained better by forming an insoluble crystal violet-iodine complex. Both Gram-positive and Gram-negative bacteria remain purple after this step.
3. Gram's decolorizer, a mixture of ethyl alcohol and acetone, is then added. This is the differential step. Gram-positive bacteria retain the crystal violet-iodine complex while Gram-negative are decolorized.
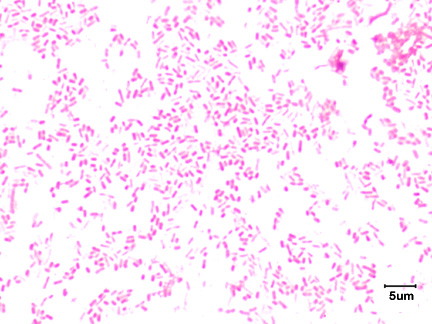
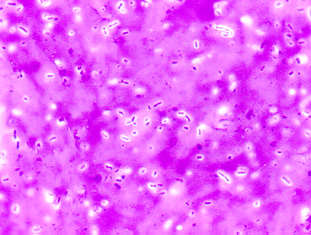
4. Finally, the counterstain safranin (also a basic dye) is applied. Since the Gram-positive bacteria are already stained purple, they are not affected by the counterstain. Gram-negative bacteria, which are now colorless, become directly stained by the safranin. Thus, Gram-positive appear purple (see Fig. 3A), and Gram-negative appear pink (see fig. 3B).
Fig. 3A: Gram Stain of Staphylococcus epidermidis
Fig. 3B: Gram Stain of Escherichia coli
Note Gram-positive (purple) cocci in irregular clusters.
Note Gram-negative (pink) bacilli. Gary E. Kaiser, Ph.D.
Professor of Microbiology
The Community College of Baltimore County, Catonsville Campus
This work is licensed under a Creative Commons Attribution 3.0 Unported License
Gary E. Kaiser, Ph.D.
Professor of Microbiology
The Community College of Baltimore County, Catonsville Campus
This work is licensed under a Creative Commons Attribution 3.0 Unported License

With the current theory behind Gram staining, it is thought that in Gram-positive bacteria, the crystal violet and iodine combine to form a larger molecule that precipitates out within the cell. The alcohol/acetone mixture then causes dehydration of the multilayered peptidoglycan, thus decreasing the space between the molecules and causing the cell wall to trap the crystal violet-iodine complex within the cell. In the case of Gram-negative bacteria, the alcohol/acetone mixture, being a lipid solvent, dissolves the outer membrane of the cell wall and may also damage the cytoplasmic membrane to which the peptidoglycan is attached. The few layers of peptidoglycan are unable to retain the crystal violet-iodine complex and the cell is decolorized.
It is important to note that Gram-positivity (the ability to retain the purple crystal violet-iodine complex) is not an all-or-nothing phenomenon but a matter of degree. There are several factors that could result in a Gram-positive organism staining Gram-negatively:
1. The method and techniques used. Overheating during heat fixation, over decolorization with alcohol, and even too much washing with water between steps may result in Gram-positive bacteria losing the crystal violet-iodine complex.
2. The age of the culture. Cultures more than 24 hours old may lose their ability to retain the crystal violet-iodine complex.
3. The organism itself. Some Gram-positive bacteria are more able to retain the crystal violet-iodine complex than others.
Therefore, one must use very precise techniques in Gram staining and interpret the results with discretion.
Trypticase Soy agar plate cultures of Escherichia coli (a small, Gram-negative bacillus) and Staphylococcus epidermidis (a Gram-positive coccus with a staphylococcus arrangement).
PROCEDURE (to be done individually)
Videos reviewing techniques used in this lab:
How to Heat-Fix a Microscope Slide
How to Prepare a Slide for Staining when using Bacteria from an Agar Culture
How to Make a Gram Stain
A Review of the Critical Decolorization Step of the Gram Stain
Focusing Using Oil Immersion (1000X) Microscopy 1. Make a Gram stain of Escherichia coli
a. Fix a smear of Escherichia coli to the slide as follows:
1. First place a small piece of tape at one end of the slide and label it with the name of the bacterium you will be placing on that slide .
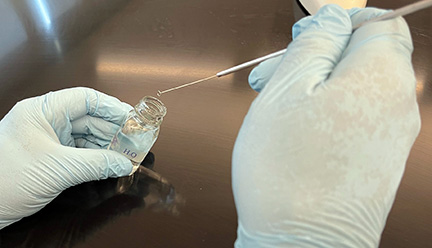
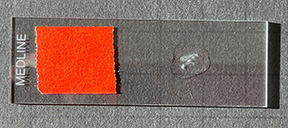
2. Sterilize your inoculating loop and place one loop full of deionized water from your dropper bottle on your slide. (See Fig. 1, Step 1, Fig. 1, Step 2, and Fig. 1, Step 3.)
Fig. 1, Step 1: Remove a Loopfull of Deionized Water
Fig. 1, Step 2: Place the Loopfull of Water on the Slide
Fig. 1, Step 3: Correct Amount of Water on the Slide
Using your sterilized inoculating loop, remove one loopfull of water from your bottle of deionized water.
Place the loopfull of water on your slide.
A loopfull of deionized water on your slide. Gary E. Kaiser, Ph.D.
Professor of Microbiology
The Community College of Baltimore County, Catonsville Campus
This work is licensed under a Creative Commons Attribution 3.0 Unported License
Gary E. Kaiser, Ph.D.
Professor of Microbiology
The Community College of Baltimore County, Catonsville Campus
This work is licensed under a Creative Commons Attribution 3.0 Unported License
Gary E. Kaiser, Ph.D.
Professor of Microbiology
The Community College of Baltimore County, Catonsville Campus
This work is licensed under a Creative Commons Attribution 3.0 Unported License
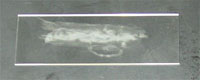
3. Using the edge of your sterile inoculating loop, aseptically remove a small amount of the culture from the agar surface (see Fig. 2, Step 1) and gently touch it several times to the drop of water until the water becomes visibly cloudy (see Fig. 2, Step 2 and Fig. 2, Step 3.)
Fig. 2, Step 1: Using the Edge of the Loop, Remove Bacteria from the Petri Plate
Fig. 2 , Step 2: Add Small Amount of Bacteria to the Water
Fig. 2 ,Step 3: Correct Amount of Bacteria Added to the Water
Using the edge of your sterilized inoculating loop, remove a small amount of bacteria from the petri plate.
Repeatedly touch the edge of the inoculating loop until the water just turns cloudy. Be carefull not to add too much bacteria.
This is the correct amount of bacteria to add to the water for a good bacterial smear.Gary E. Kaiser, Ph.D.
Professor of Microbiology
The Community College of Baltimore County, Catonsville Campus
This work is licensed under a Creative Commons Attribution 3.0 Unported License
Gary E. Kaiser, Ph.D.
Professor of Microbiology
The Community College of Baltimore County, Catonsville Campus
This work is licensed under a Creative Commons Attribution 3.0 Unported License
Gary E. Kaiser, Ph.D.
Professor of Microbiology
The Community College of Baltimore County, Catonsville Campus
This work is licensed under a Creative Commons Attribution 3.0 Unported License
4. Incinerate the remaining bacteria on the inoculating loop. If too much culture is added to the water, you will not see stained individual bacteria.
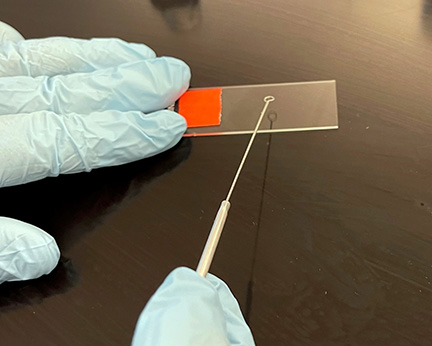
5. After the inoculating loop cools, spread the suspension over the slide to form a thin film. (See Fig. 3.)
Fig. 3: Spread the Mixture over the Slide
Using the loop, spread the mixture over the entire slide to form a thin film.
Gary E. Kaiser, Ph.D.
Professor of Microbiology
The Community College of Baltimore County, Catonsville Campus
This work is licensed under a Creative Commons Attribution 3.0 Unported License
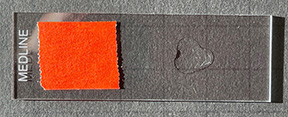
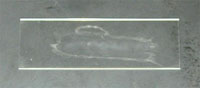
6. Allow this thin suspension to completely air dry (see Fig. 4). The smear must be completely dry before the slide is fixed!
Fig. 4: Let Slide Air Dry
Allow this thin suspension to completely air dry. A thin, powdery film should appear on the slide.Gary E. Kaiser, Ph.D.
Professor of Microbiology
The Community College of Baltimore County, Catonsville Campus
This work is licensed under a Creative Commons Attribution 3.0 Unported License
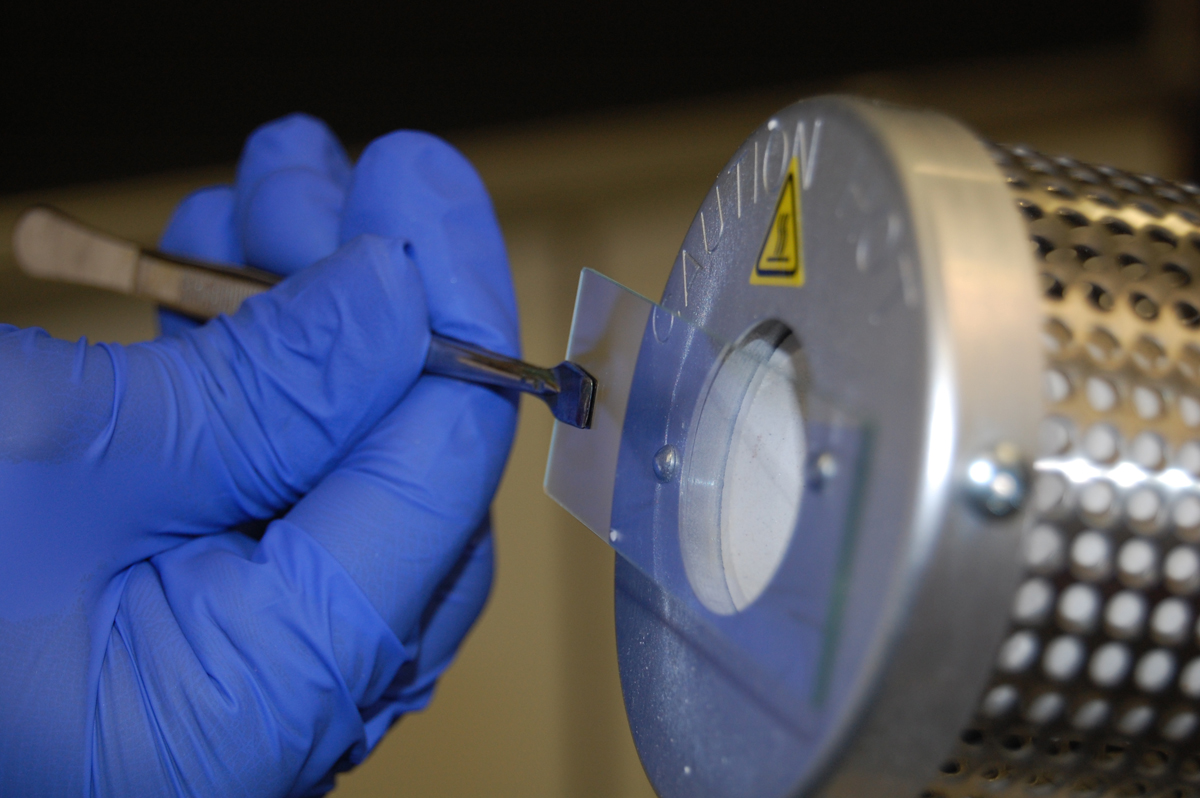
7. If your professor instructs you to heat-fix the bacteria to the slide, pick up the air-dried slide with provided close pin and hold the bottom of the slide opposite the smear against the opening of the bacto-incinerator for 10 seconds (see Fig. 5). If the slide is not heated enough, the bacteria will be washed off the slide. If it is overheated, the bacteria structural integrity can be damaged.
Fig. 5: Heat Fixing a Slide
To heat-fix the bacteria to the slide, pick up the air-dried slide with coverslip forceps and hold the bottom of the slide opposite the smear near the opening of the bacto-incinerator for 10 seconds.Gary E. Kaiser, Ph.D.
Professor of Microbiology
The Community College of Baltimore County, Catonsville Campus
This work is licensed under a Creative Commons Attribution 3.0 Unported License
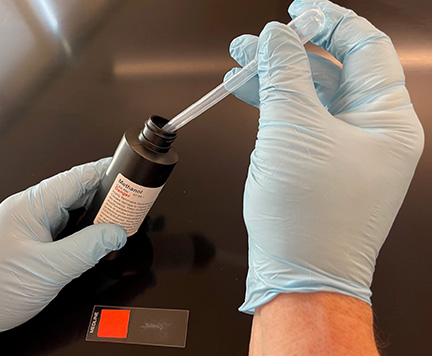
8. If your professor instructs you to fix the bacteria to the slide using methanol, add 2-3 drops of 95% methanol to the air-dried smear of bacteria (see Fig. 6) and let sit for 2 minutes or until the methanol evaporates. Let the slide again air dry before staining.
Fig. 6: Add 2-3 Drops of Methanol to "Fix" the Smear
Using a disposable pipette, add 2-3 drops of 95% methanol to the bacterial smear. Let sit for 2 minutes or until the methanol evaporates. Allow to completely air dry. A thin, powdery film should appear on the slide.Gary E. Kaiser, Ph.D.
Professor of Microbiology
The Community College of Baltimore County, Catonsville Campus
This work is licensed under a Creative Commons Attribution 3.0 Unported License
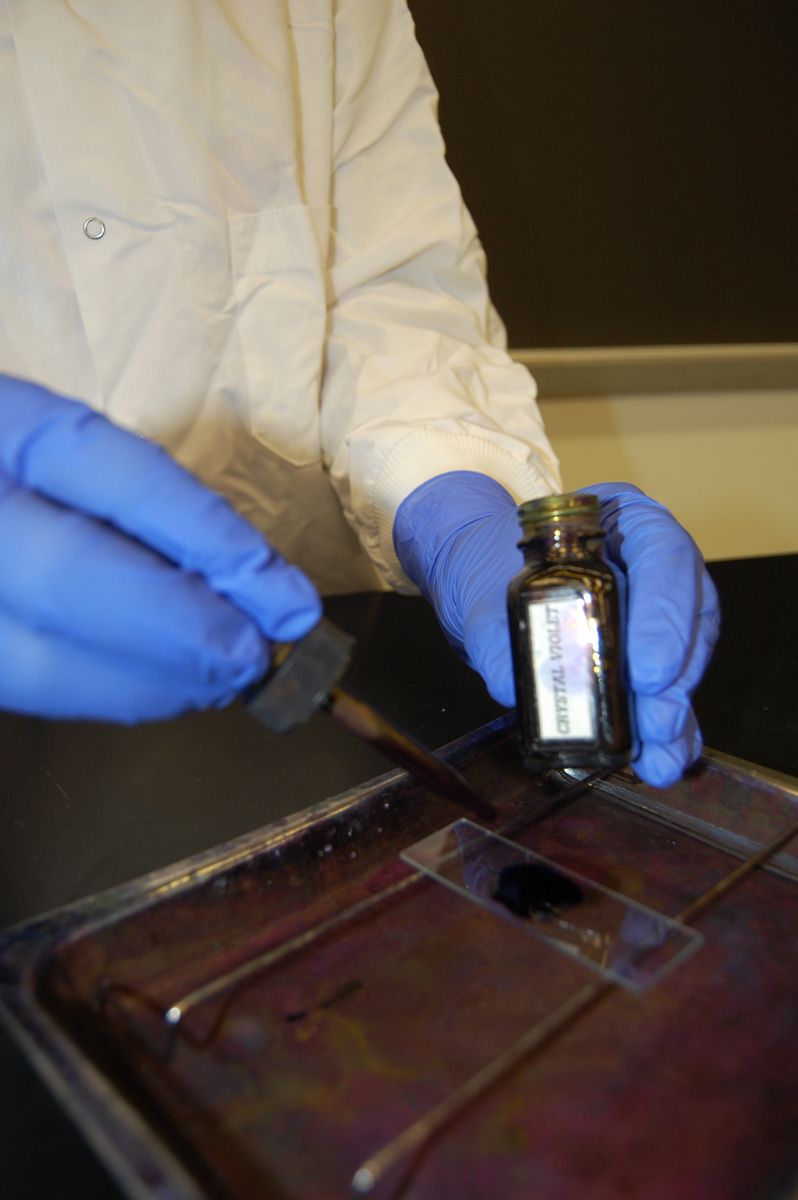
b. Stain with Hucker's crystal violet for one minute (see Fig. 7.) Gently wash with water (see Fig. 8.) Shake off the excess water but do not blot dry between steps.
Fig. 7: Gram Stain: Staining with Crystal Violet
Fig. 8: Gram Stain: Washing with Water
Stain with Hucker's crystal violet for one minute.
Use your water bottle to gently wash off the excess stain. Shake off the excess water but do not blot dry between steps.Gary E. Kaiser, Ph.D.
Professor of Microbiology
The Community College of Baltimore County, Catonsville Campus
This work is licensed under a Creative Commons Attribution 3.0 Unported License
Gary E. Kaiser, Ph.D.
Professor of Microbiology
The Community College of Baltimore County, Catonsville Campus
This work is licensed under a Creative Commons Attribution 3.0 Unported License
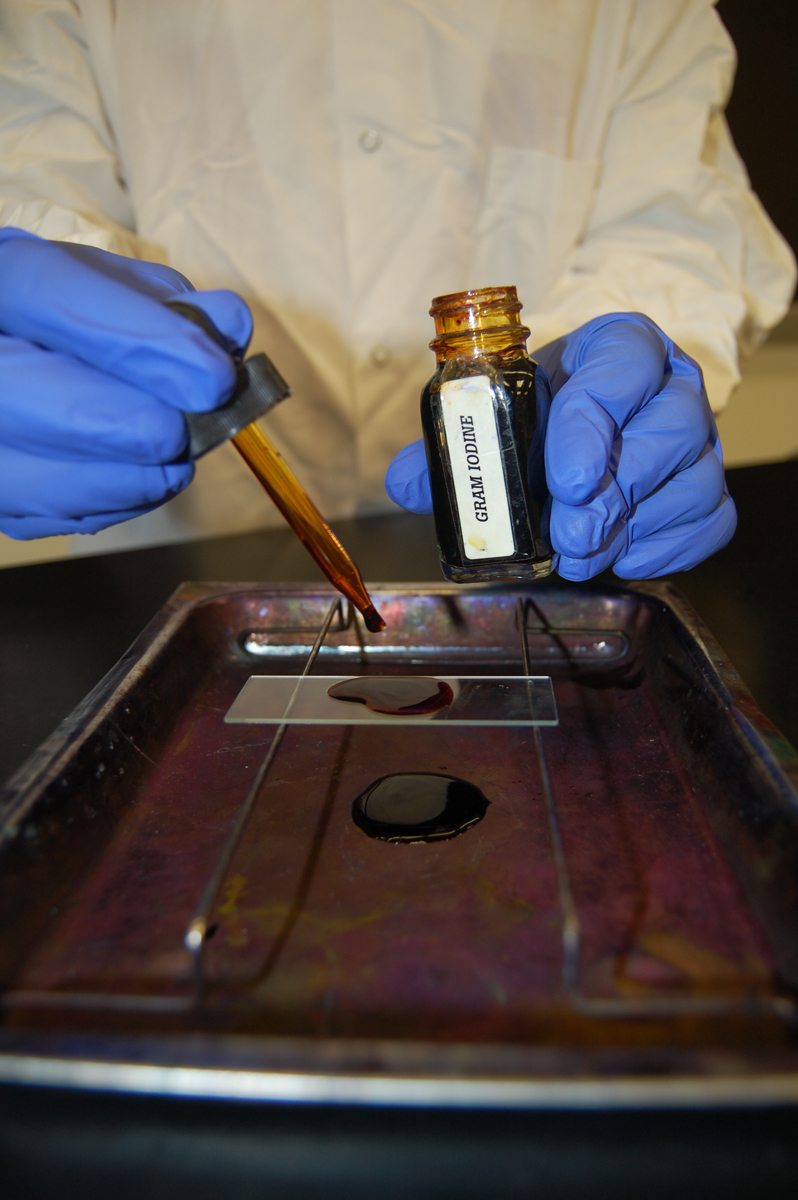
c. Stain with Gram's iodine solution for one minute (see Fig. 9) and gently wash with water.
Fig. 9: Gram Stain: Treating with Gram's Iodine Solution
Stain with Gram's iodine solution for one minute and gently wash with water.Gary E. Kaiser, Ph.D.
Professor of Microbiology
The Community College of Baltimore County, Catonsville Campus
This work is licensed under a Creative Commons Attribution 3.0 Unported License
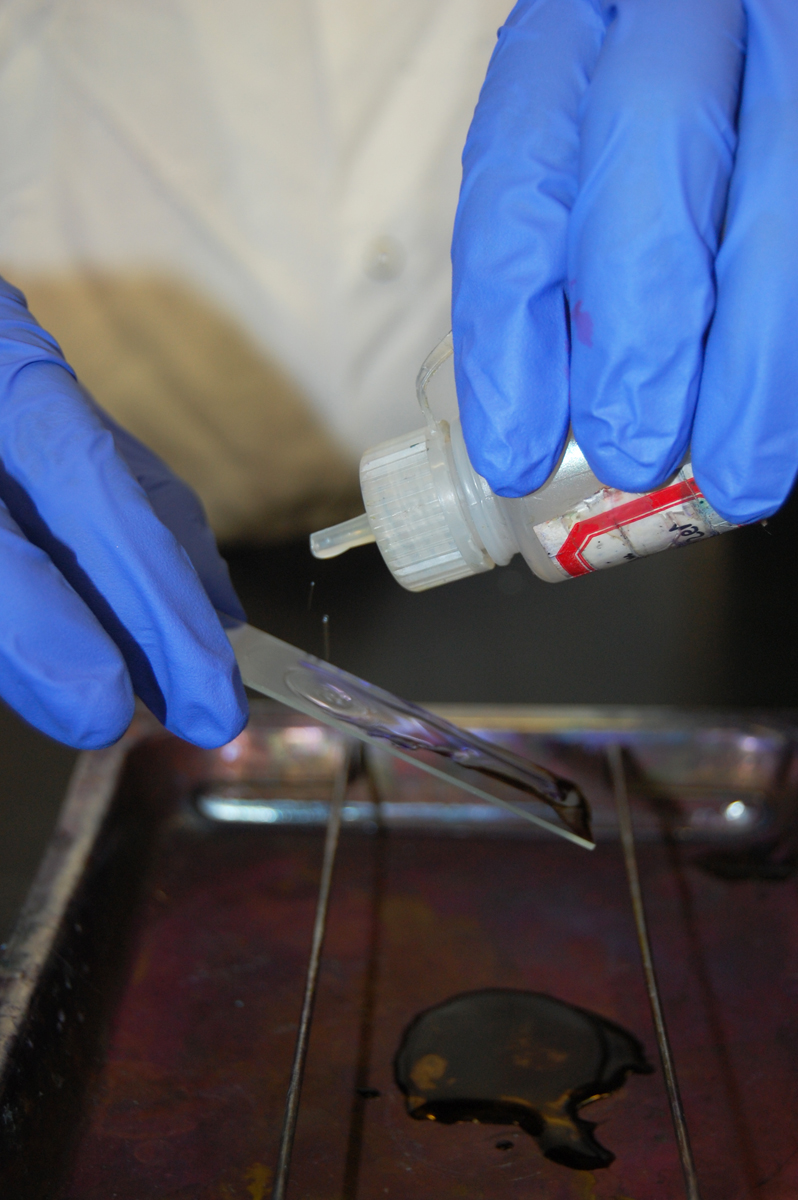
d. Decolorize by picking up the slide and letting the Gram's decolorizer run down the slide until the purple just stops flowing at the bottom of the slide (see Fig. 10).
Fig. 10: Gram Stain: Decolorizing with Gram's Decolorizer
Decolorize by adding Gram's decolorizer drop by drop until the purple just stops flowing. Wash immediately with water.Gary E. Kaiser, Ph.D.
Professor of Microbiology
The Community College of Baltimore County, Catonsville Campus
This work is licensed under a Creative Commons Attribution 3.0 Unported License
- Make sure the entire smear is evenly decolorized and that you are not under-decolorizing or over-decolorizing.
- Wash immediately with water.
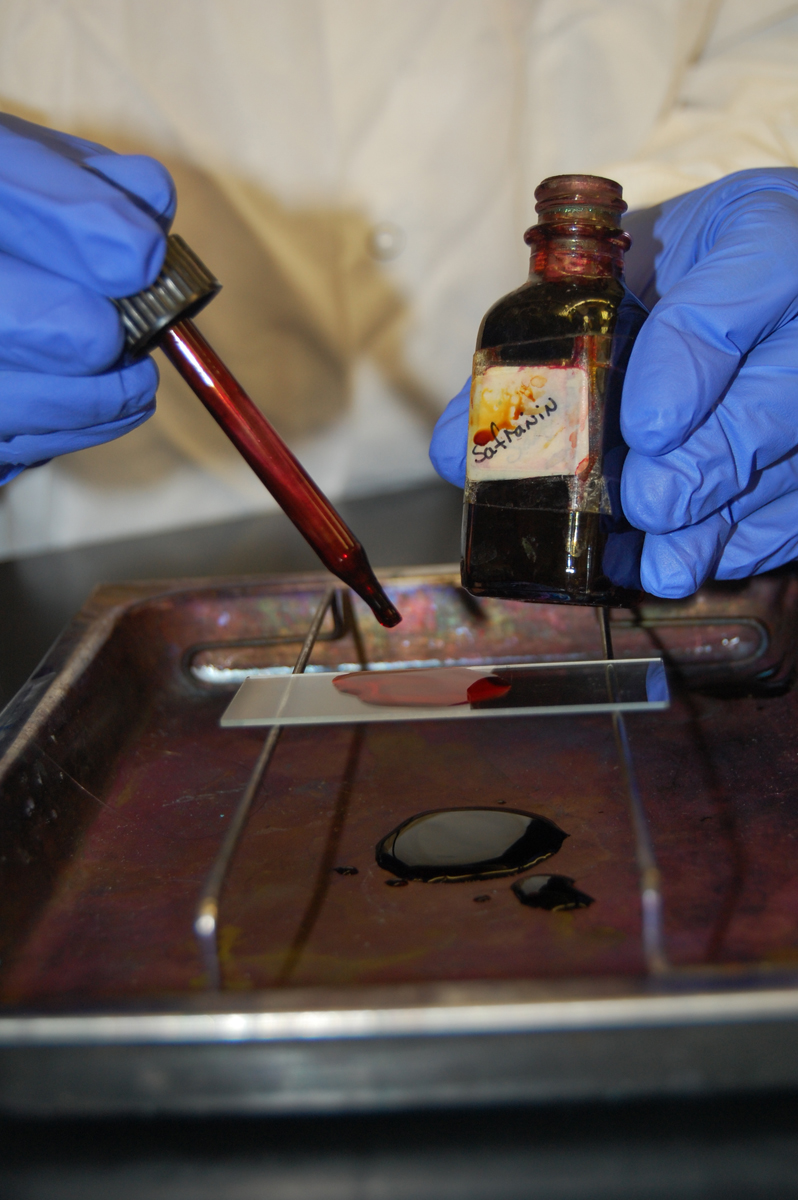
e. Stain with safranin for one minute (see Fig. 11). When you wash off the excess safranin, be very careful to wash gently and briefly as it is possible to wash out some of the sarfanin in the bacterium.
Fig. 11: Gram Stain: Counterstaining with Safranin
Stain with safranin for one minute and gently wash with water.Gary E. Kaiser, Ph.D.
Professor of Microbiology
The Community College of Baltimore County, Catonsville Campus
This work is licensed under a Creative Commons Attribution 3.0 Unported License
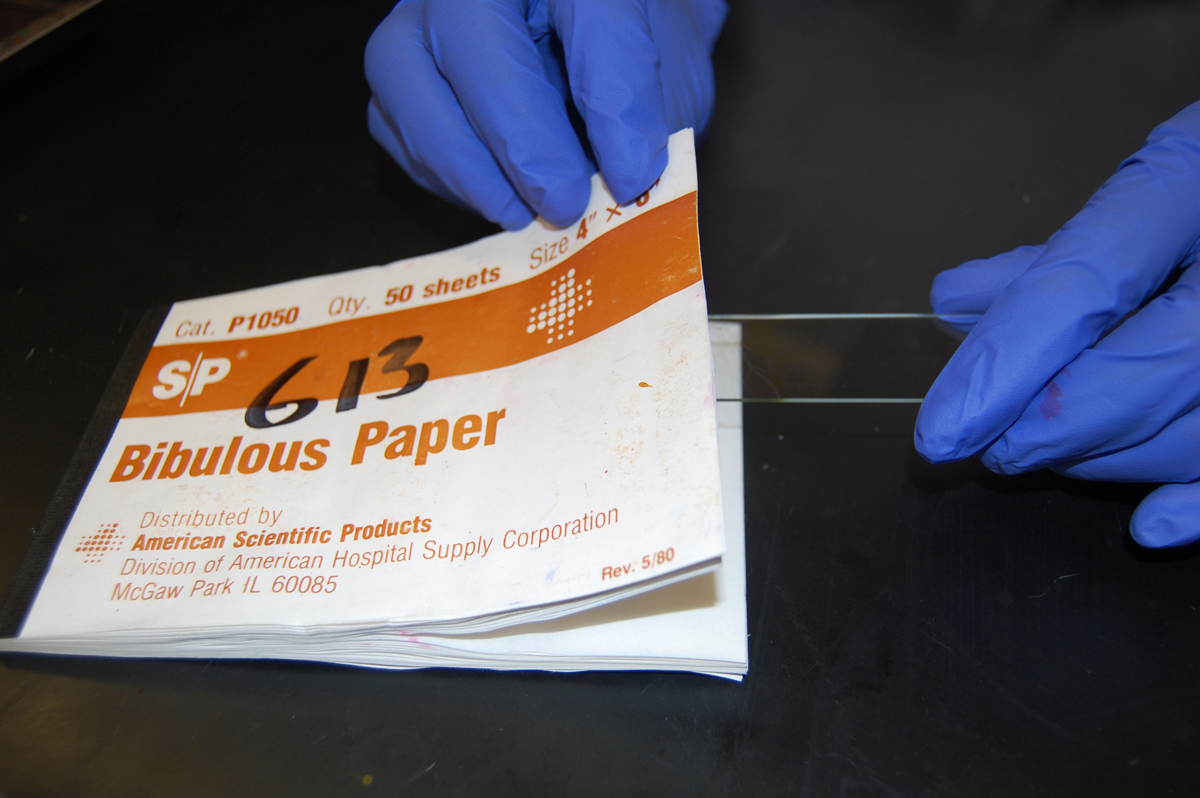
f. Blot dry (see Fig. 12) and observe using oil immersion microscopy.
Fig. 12: Blotting the Slide Dry
Use a book of blotting paper to blot the slide dry. Gary E. Kaiser, Ph.D.
Professor of Microbiology
The Community College of Baltimore County, Catonsville Campus
This work is licensed under a Creative Commons Attribution 3.0 Unported License
2. Using the same procedure described above, make a second Gram stain of Staphylococcus aureus.
3. Make sure you carefully pour the used dye down the designated drains at the three lab benches, not down the sink.


DISCUSSION
Many bacteria secrete a slimy, viscous covering called a capsule or glycocalyx (see Fig. 1). This is usually composed of polysaccharide, polypeptide, or both.
Fig. 1: Capsule stain of Klebsiella aerogenes (formerly known as Enterobacter aerogenes)
Note colorless capsules surrounding purple bacilli.Gary E. Kaiser, Ph.D.
Professor of Microbiology
The Community College of Baltimore County, Catonsville Campus
This work is licensed under a Creative Commons Attribution 3.0 Unported License
The ability to produce a capsule is an inherited property of the organism, but the capsule is not an absolutely essential cellular component. Capsules are often produced only under specific growth conditions. Even though not essential for life, capsules probably help bacteria to survive in nature. Capsules help many pathogenic and normal flora bacteria to initially resist phagocytosis by the host's phagocytic cells. In soil and water, capsules help prevent bacteria from being engulfed by protozoans. Capsules also help many bacteria to adhere to surfaces and thus resist flushing. It also enables many bacteria to form biofilms. A biofilm consists layers of bacterial populations adhering to host cells and embedded in a common capsular mass.
For further information on the bacterial capsules, see the following in your CourseArc Lectures:
ORGANISM
Skim Milk broth culture of Klebsiella aerogenes (formerly known as Enterobacter aerogenes). The skim milk supplies essential nutrients for capsule production and provides a slightly stainable background.
PROCEDURE (to be done individually)
1. Stir up the Skim Milk broth culture with your loop and place 2-3 loops of Klebsiella aerogenes on a microscope slide.
2. Using your inoculating loop, spread the sample out to cover about one inch of the slide.
3. Let it completely air dry. Do not heat fix. Capsules stick well to glass, and heat may destroy the capsule.
4. Stain with crystal violet for one minute.
5. Wash off the excess dye with 20% copper sulfate solution.
6. Shake off the excess copper sulfate solution and immediately blot dry.
7. Observe using oil immersion microscopy. The organism and the milk dried on the slide will pick up the purple dye while the capsule will remain colorless.
8. Make sure you carefully pour the used dye in your staining tray into the waste dye collection container, not down the sink.
9. Observe the demonstration capsule stain of Streptococcus lactis , an encapsulated bacterium that is normal microbiota in milk (see Fig. 2).
Fig. 2: Capsule stain of Streptococcus lactis
Note the colorless capsules surrounding the purple streptococci.Gary E. Kaiser, Ph.D.
Professor of Microbiology
The Community College of Baltimore County, Catonsville Campus
This work is licensed under a Creative Commons Attribution 3.0 Unported License

A. The Gram Stain
Make drawings of each bacterium
on your Gram stain preparation.
|
|
|
| Color = Gram reaction = Shape = |
Color = Gram reaction = Shape = Arrangement = |

B. The Capsule Stain
Make a drawing of your capsule stain
preparation of Enterobacter aerogenes and the demonstration capsule stain
of Streptococcus pneumoniae.
|
PERFORMANCE OBJECTIVES LABORATORY 6
After completing this lab, the student will be able to perform the following objectives:
A. THE GRAM STAIN
DISCUSSION
1. State why the Gram stain is said to be a differential stain.
2. Describe the differences between a Gram-positive and a Gram-negative cell wall.
3. Describe a theory as to why Gram-positive bacteria retain the crystal violet-iodine complex while Gram-negatives become decolorized.
4. Describe three conditions that may result in a Gram-positive organism staining Gram-negatively.
PROCEDURE
1. State the procedure for the Gram stain.
2. Perform a Gram stain when given all the necessary materials.
RESULTS
1. Determine if a bacterium is Gram-positive or Gram-negative when microscopically viewing a Gram stain preparation and state the shape and arrangement of the organism.
B. THE CAPSULE STAIN
DISCUSSION
1. State the chemical nature and major functions of bacterial capsules.
RESULTS
1. Recognize capsules as the structures observed when microscopically viewing a capsule stain preparation.
SELF-QUIZ

Microbiology Laboratory Manual by Gary E. Kaiser, PhD, Professor of Microbiology
is licensed under a Creative Commons Attribution 4.0 International License.
Last updated: March, 2023
Please send comments and inquiries to Dr.
Gary Kaiser